This blog post is part two of a three-part series on macro authentication. Be sure to catch up on part one here!
Welcome to part two in our “Unlocking the Power of Macro Authentication” series! Where we last left off, we added a macro file into our dynamic application security testing (DAST) solutions, InsightAppSec for authentication and, because there was an error, the scan failed. There can be many types of errors, and there may be one or more ways to solve the same problem. Because of this, it is important to know where to look and understand how macro authentication works.
In this post, we will review how to understand these error messages and what steps to take to get our authentication macro working.
Why did my macro fail?
If this happens, one of the first steps would be to review the Event Logs of the scan in order to find out exactly what in the macro failed. Here are a couple things to verify before we jump straight to the event logs:
- Check that the credentials provided and used when recording a macro for authentication are still valid and working. In case the credentials aren’t valid anymore, you can record a macro the same way as described in the section “How do I record a macro?” in part one.
- Verify again the perspective of your application and how InsightAppSec or AppSpider will “see” it. If your application is accessible only after allowing traffic between servers, it would be worth going onto the server the scan is running from. In this case, we assume you are leveraging an on-premises engine connected to InsightAppSec or AppSpiderEnterprise, which you should have access to in order to log on and test the authentication process from a browser there. If you notice a difference in the authentication sequence this time compared to the first time when you recorded it, it may make sense to re-record the macro according to the current authentication sequence.
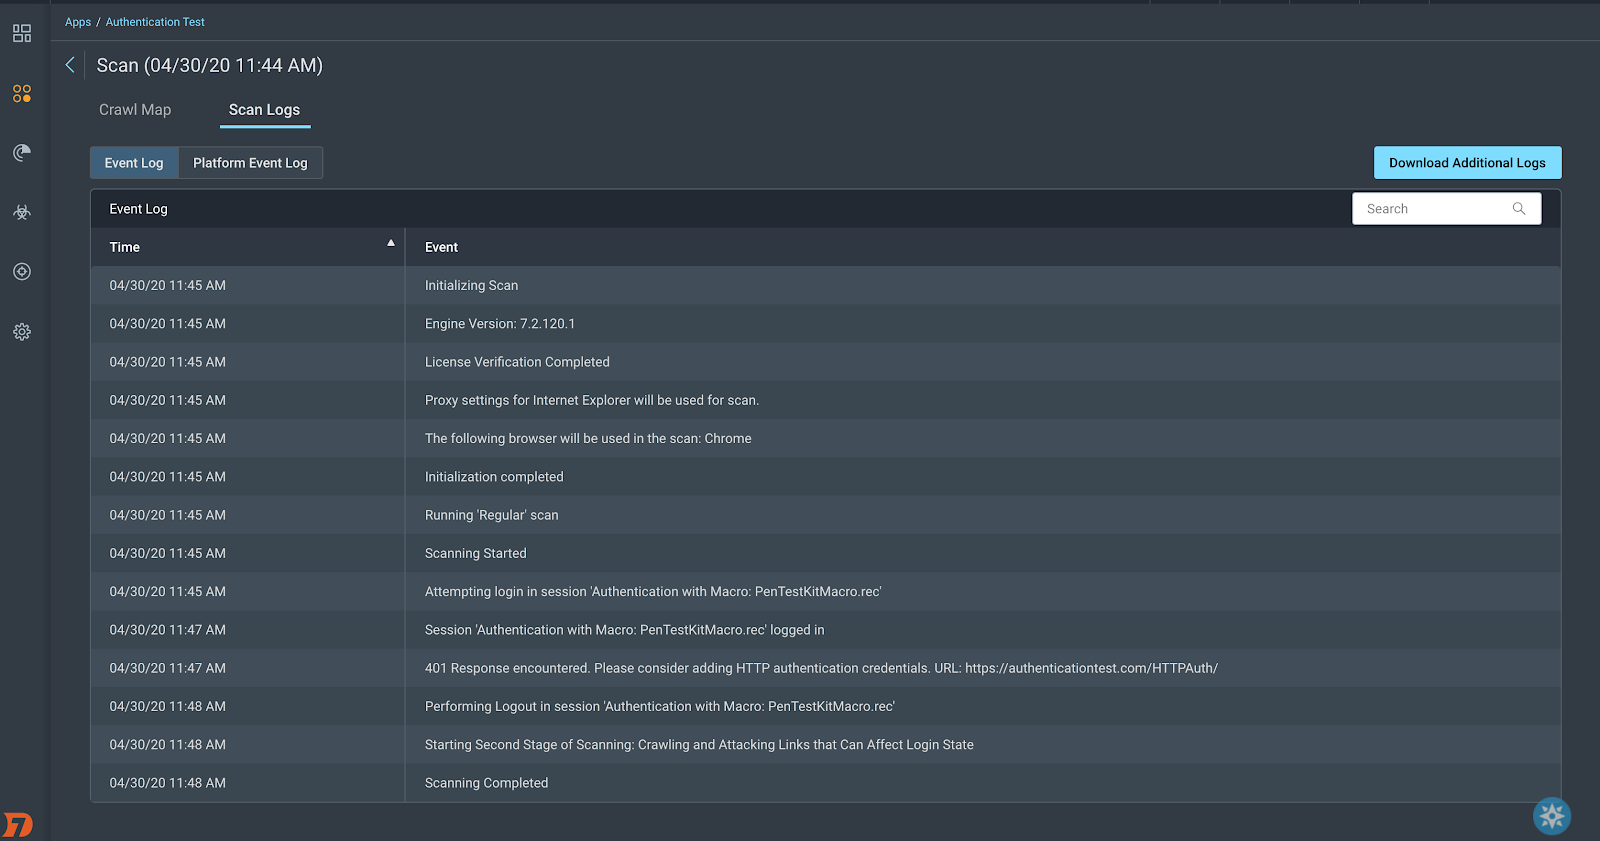
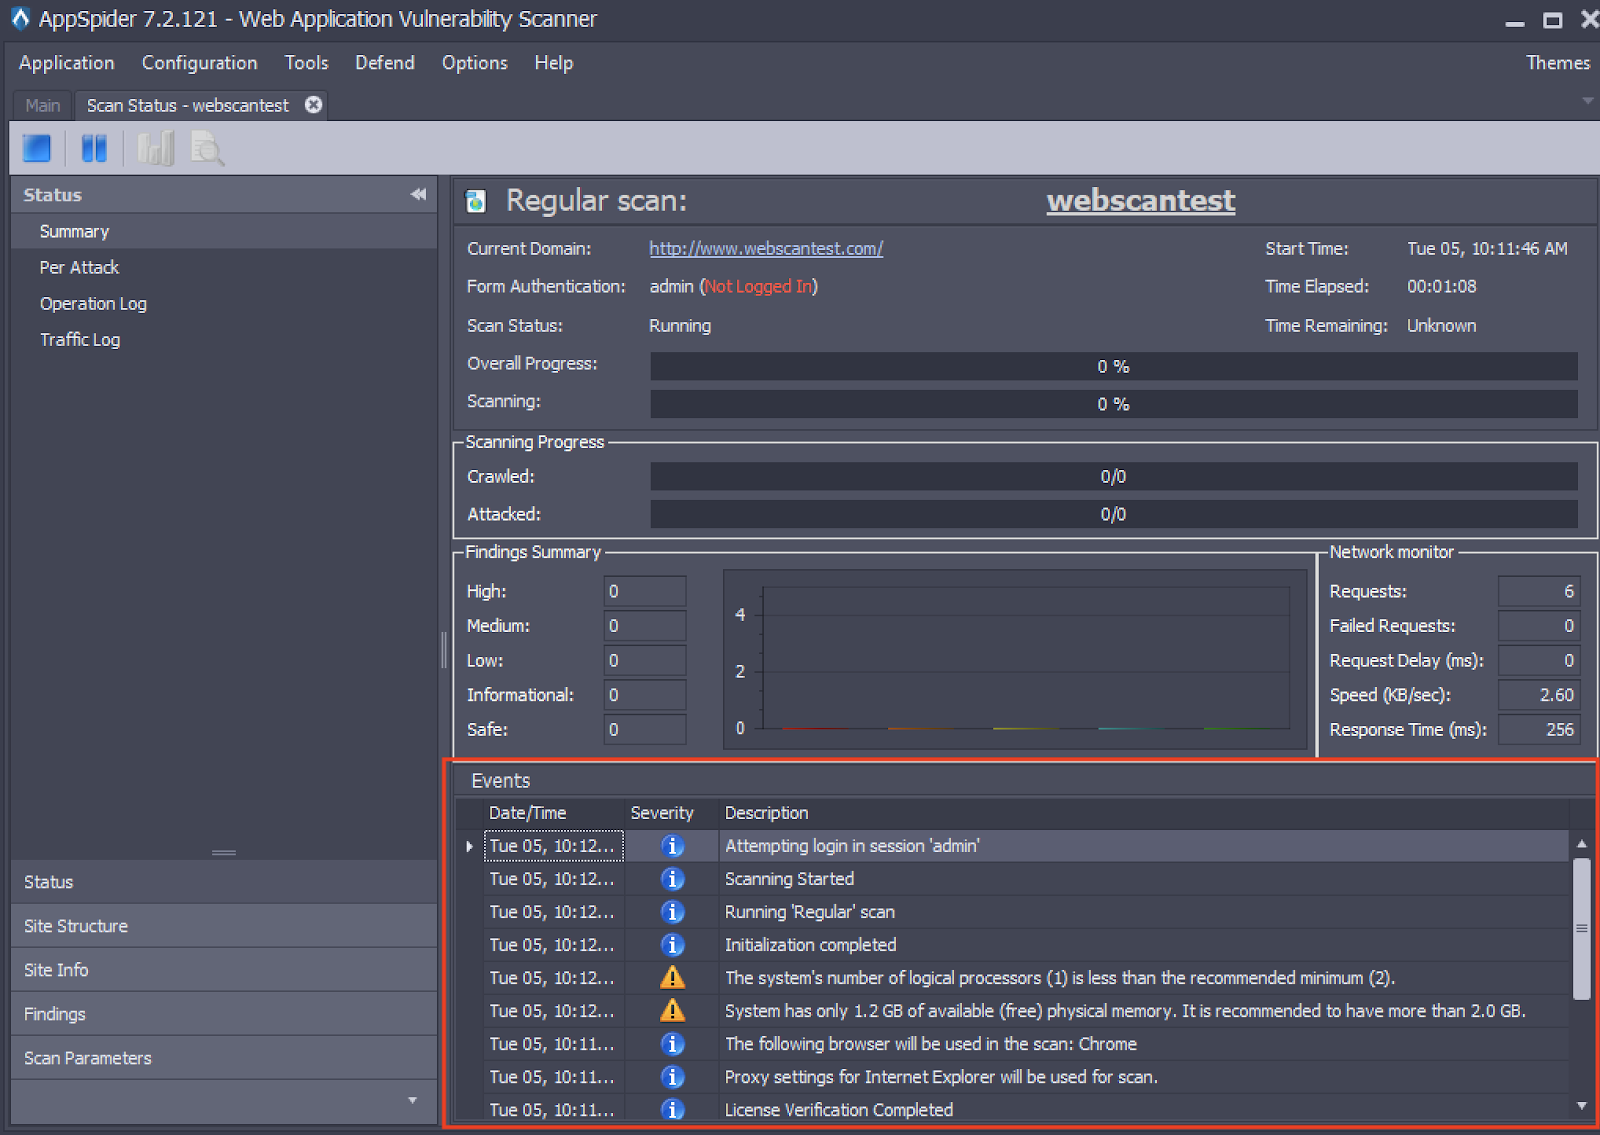
Once the above steps have been verified, now we can jump to the Event Logs view of our scan. Below are the screenshots to show where you can find the information we need:
- For InsightAppSec:
2. For AppSpider Pro Edition:
3. For AppSpider Enterprise:
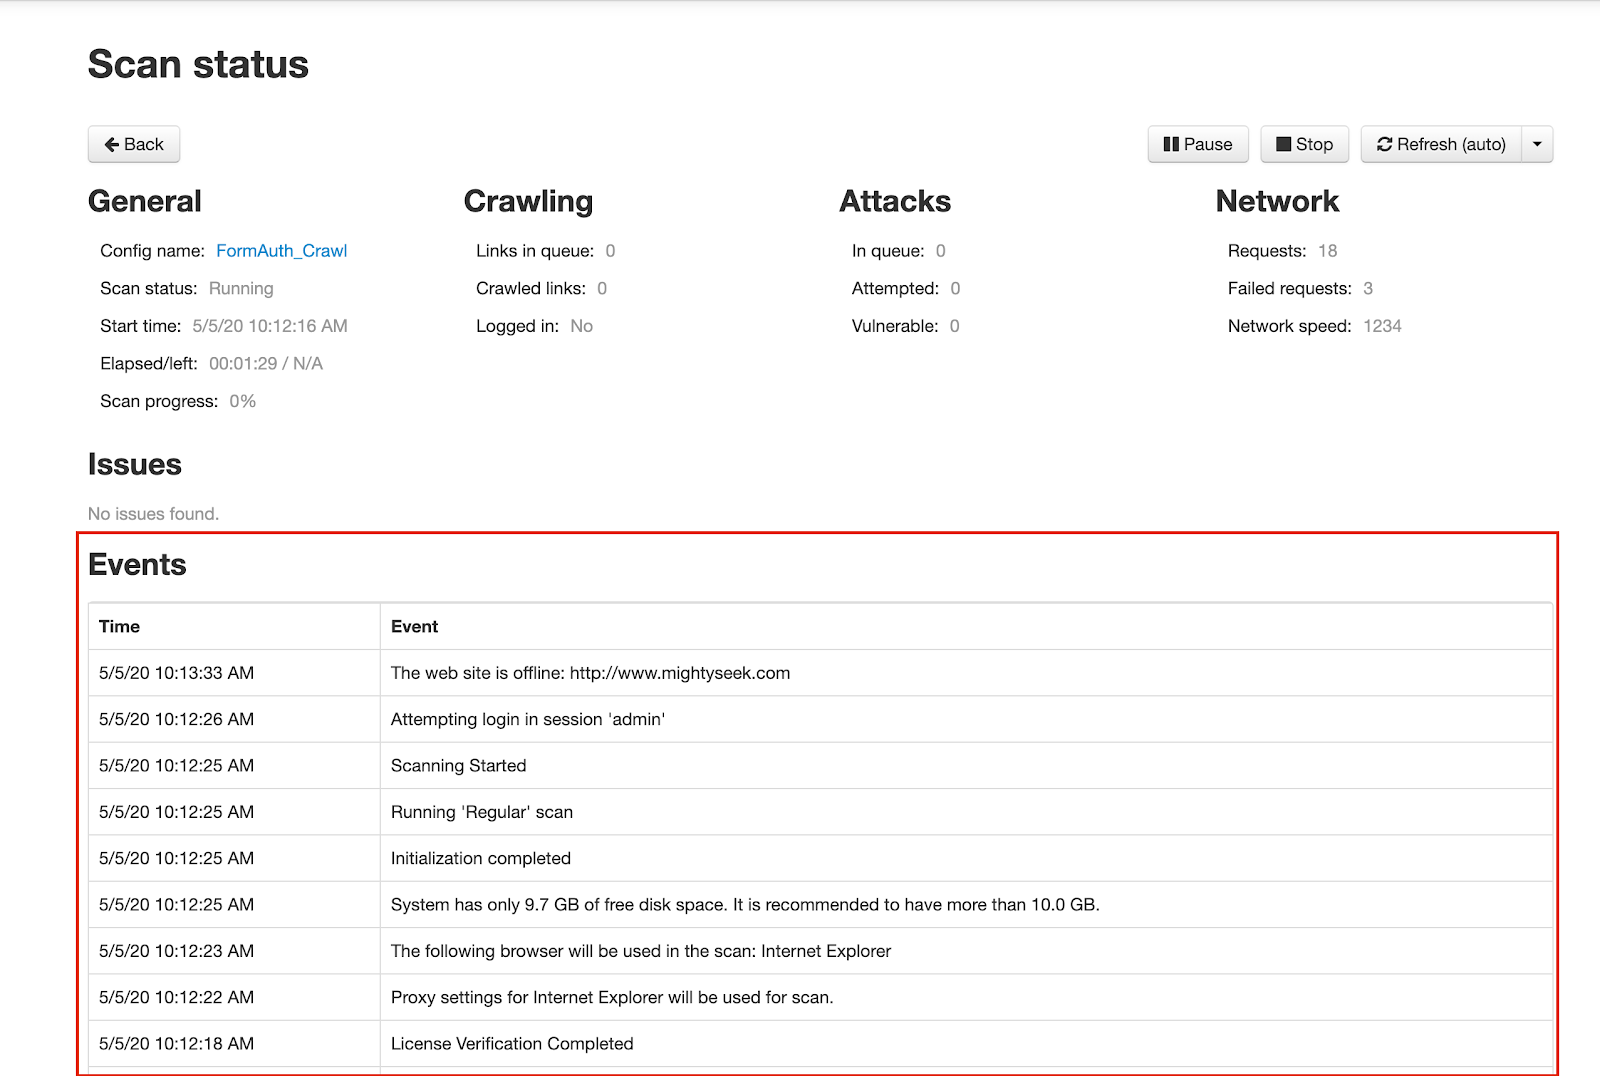
Once we have found the relevant event logs for our scan, it's time to find out why the scan failed.
It is important to review our event logs, because for any sort of authentication failure, the logs will indicate what went wrong. Some of the common types of errors are listed below, and we will review troubleshooting these errors in detail in the following sections.
“The website is offline: http://dev.companydomain.com”
This error indicates that the engine couldn’t “see” your application when it attempted to interact with it, and attempting to replay the macro authentication could not occur.
- It would make sense to review the scan config and see what engine was being used when running this particular scan. If there are network issues to be resolved or a different engine needs to be used, make those changes and attempt to scan again.
- It would also make sense to re-record the macro from the perspective of the engine to make sure you have a new macro covering the relevant steps in case the authentication sequence looks different compared to when the macro was first recorded. This is especially recommended in the case of using on-premises engines.
- If you are using cloud engines with InsightAppSec and you know your application is publicly accessible, verify if you can reach this application from an outside resource. Also check whether any WAF or web technology is blocking communication from our cloud engines. If there is whitelisting to be done, use the following information to whitelist (Whitelist Cloud Engine Ips), make Rapid7 Cloud Engines (For InsightAppSec) accessible to your application, and attempt a rescan after that.
“Error executing macro”
This error will indicate which specific macro event the macro was not able to execute in the event log. It will look something like this:
Session 'Authentication with Macro: macroauth.rec' could not log in: Error executing Macro
'C:\AppSpider\Macro\macroauth.rec', error in step 3: Could not find element 'xpath=//INPUT[@name="lgin"]'. Error: Could not find start element:INPUT[@name="lgin"]: Could not find element by name: No global elements with such name
“Error executing macro” will indicate what step of the various recorded steps of the macro for authentication are not able to execute correctly. The above is an example of an error message for “Error executing macro.” It could reflect a different step or detail of the message in your case, but will most likely contain “Error executing macro.” Remember from part one, we reviewed where each macro event has elements:
<Enable>1</Enable>
<Optional>0</Optional>
Both indicate that the specific macro event is enabled and not an optional step. Unfortunately, in most cases, making events optional is not an option, since that defeats the purpose of recording a macro for authentication as each step is important. We will discuss this later when we can mark a macro event as optional. (Hint: Macro events should only be marked optional if the interaction on a page is only to happen if the page is a one-time event, i.e., “Are you over 21” type prompts, “remember computer” prompts, or an intermediary page between authentication and the application.)
If we were to start troubleshooting this macro, the first step would be to track the macro file down and find step three, which can be seen in the snippet below:

Keep in mind that each <MacroEvent>... </MacroEvent> is one step, so you will need to count from the first macro event at the top down to the step mentioned in the event log error. Since this particular error is in step three, that means it is very early in the macro, and because it failed, the macro failed to execute any other macro events succeeding it. Our error message indicates that:
Error: Could not find start element:INPUT[@name="lgin"]
We can reference our sample application WebScanTest to see what it actually should have been.

Upon inspecting “Element” for one of the first buttons we clicked on when we began recording, we see that the field we are looking for is “login.” “Lgin” is actually incorrect and doesn’t exist, so therefore, it cannot be found.
The above error is the cause of a manipulated use case of altering the xpath element to cause it to fail. But when a macro event does fail because of an element not being found, a couple things can be done:
- Validate the element you are looking for does in fact exist every time when logging in, so you know there is consistency with that element existing.
- It may be that when the macro is replaying during a scan, it may not be giving enough time for the application to render and the duration of that macro event might be too short.
If it’s the second use case mentioned above—that the duration of the event might be too short—try increasing the <Duration>XXXX</Duration> element of that specific macro event. As we have discussed previously, this value is in milliseconds. For safe measures, you can try doubling or tripling the value of said macro event. This will allow for an increase in the amount of time to be spent on that specific macro event, and the overall macro might take slightly longer to execute before indicating a success or failure.
If your macro now gives you a slightly different error message, like getting the LoggedInRegex failure error, you can follow the steps in the section LoggedInRegex Failure below and continue troubleshooting. If you get another “Error executing macro” error, but this time it's a different step number, follow the same troubleshooting steps, increasing the <Duration> element step as discussed above, or try increasing the event duration for all macro events to be safe and attempt to run a scan again to test out your macro.
Increasing the duration of a particular macro event to solve an “Error executing macro …” error message is a good first step in attempting to resolve the macro event error. If increasing the time does not help, there may be a larger issue at hand, which will need a bit more in-depth understanding of your application’s authentication workflow and elements involved. We will review advanced troubleshooting in part three of this blog series.
“LoggedInRegex failure”
This error will be denoted by two event logs as follows:
- Session 'Authentication with Macro: macroauth.rec' could not log in: Failed to login: LoggedInRegex did not detect logged in state. You may need to update 'LoggedInRegex' in scan configuration.
- Scan will be stopped because of the following error: Session 'Authentication with Macro: macroauth.rec' could not log in. Error: Failed to login: LoggedInRegex did not detect logged in state. You may need to update 'LoggedInRegex' in scan configuration.
These error messages will show up in tandem and only come up if all events of the macro were successfully executed, but the macro failed at the very end. We know that because we would have seen the error message beginning with “Error executing macro,” had the macro failed at any other point.
We now know that our macro events played out successfully, but still authentication failed because of the LoggedInRegex. To understand this better, let's take a look at an example. Imagine opening a web application, putting in a username and password, clicking on the sign-in button, and logging in. As a user, we can tell we have logged in by looking at the screen, understanding changes on the pages, and landing on a page, which we expect to see after successful authentication.
But for a scanner to know that, it’s not possible. Or is it?
When a scan replays various macro events based on the exact sequence of events as recorded, it is expected that, at the end, the page the scanner is now rendering should be a page you only see after successfully logging in. In order to confirm that we are now in an authenticated portion of the application, the scanner leverages a Logged-In regex, which is by default set to”(sign|log)[ -]?(out|off)“. This means that after executing all macro events, we are looking for elements in the HTML response that indicate sign out, sign off, log out or log off, as those elements should be visible in the HTML of a logged-in application. (Ideally, you can only see a logout button if you are actually logged in). If the regex successfully passes, a macro used for authentication will successfully finish executing, the authentication event will be successful, and an authenticated scan will occur.
So, how do we troubleshoot this? Even though all events of the macro may have executed successfully, the authentication event failed because of LoggedInRegex not detecting a logged-in state. We have to go back to our application and examine the HTML response. Are there elements that our default Logged-In Regex can match with, or would we have to do the following:
- Re-record the macro to expose the page where the logged-in regex can match.
- Modify the regex to make sure it matches something in the HTML response of the last page we land on so that our scan can continue interacting with the authenticated application.
- If there is nothing in the HTML response that we can use to add to our default LoggedInRegex, we may have to create a simple Logged In Header regex, which looks at the HTTP request/response for a specific header value. This is typically either a Bearer token, a session ID, or something else, which you can use to validate an authenticated session.
To know which step to take above, it's best to go back to our web application and attempt to re-authenticate into it. You can do this in your browser, by having the Developer tools open to the network tab and making sure to view either the response of the page we landed on or the cookies tab, both of which will come in handy as we test out our regex for the scan configuration.
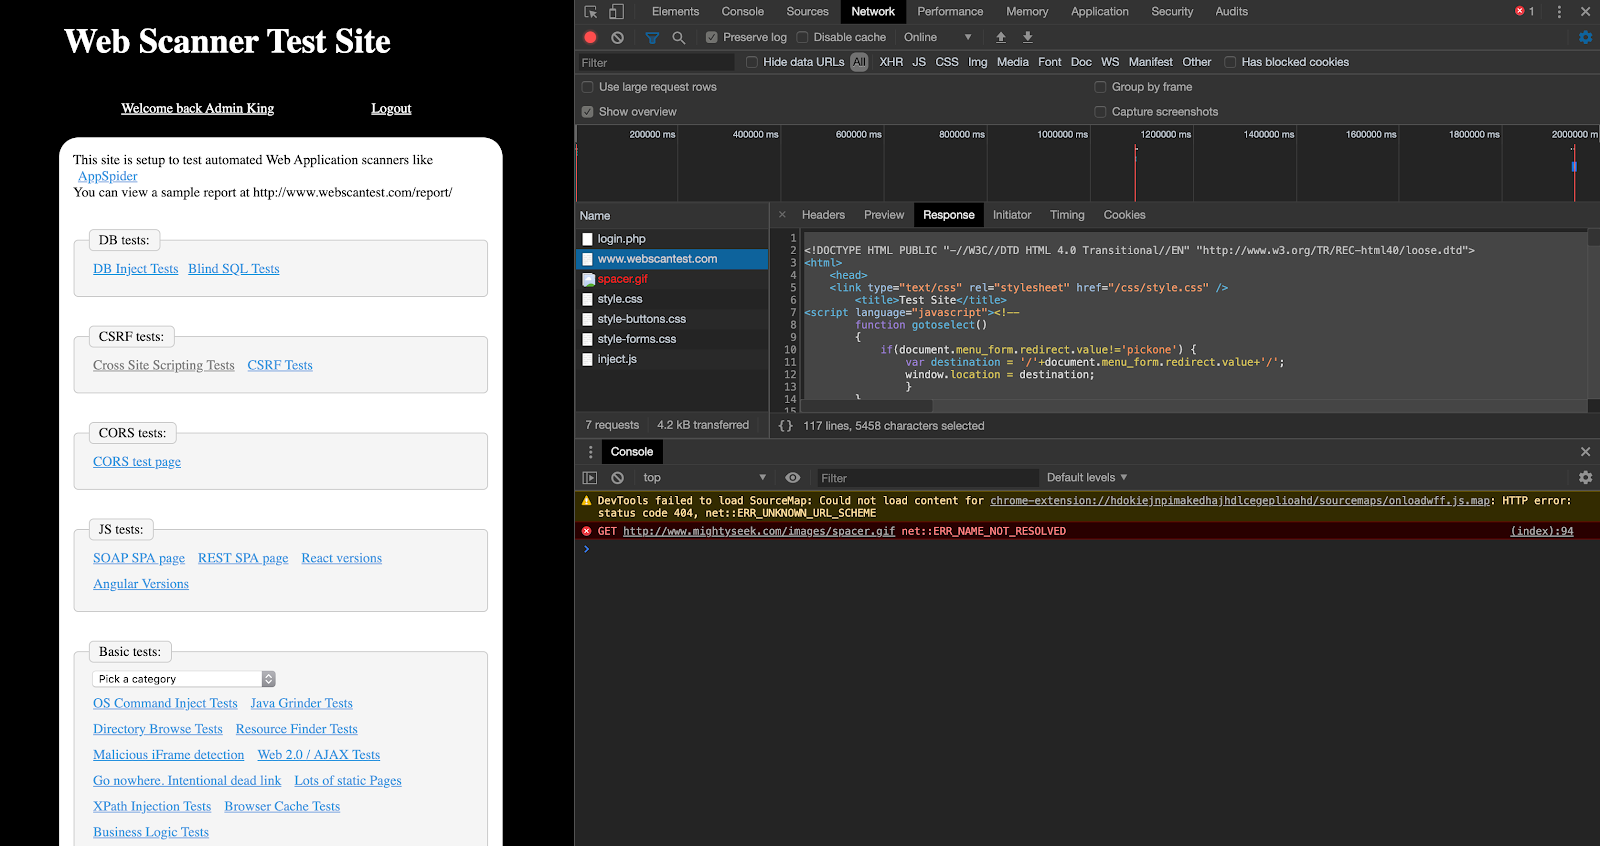
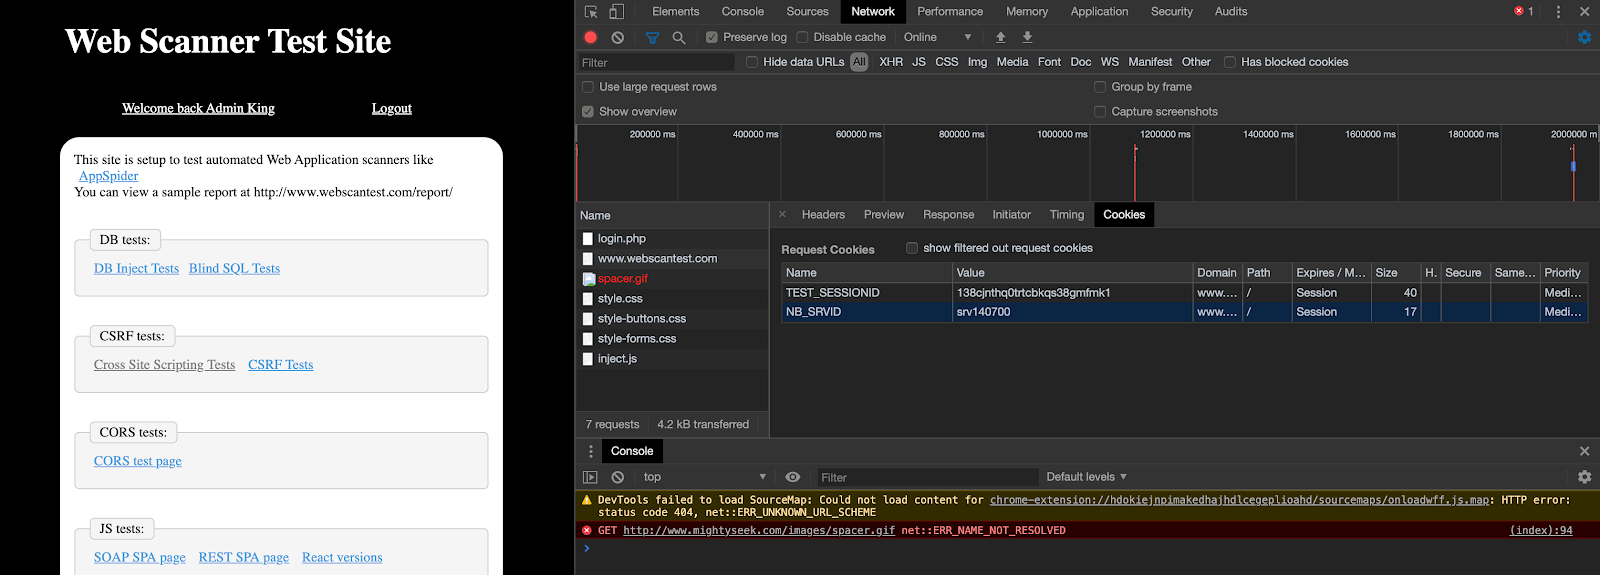
A regex is a sequence of characters that define a search pattern. In the case of “(sign|log)[ -]?(out|off)”, it was made to search for sign out, sign off, log out or log off with or without spaces between. To validate whether your application can successfully match the default regex, copy the HTML content as seen in the response tab of Developer tools, from the page you landed on post authentication, and take it to a regex validation site like https://regex101.com/.You can also use the AppSec Toolkit to use the Regex Builder utility within to validate the default regex to the HTML that you just copied.
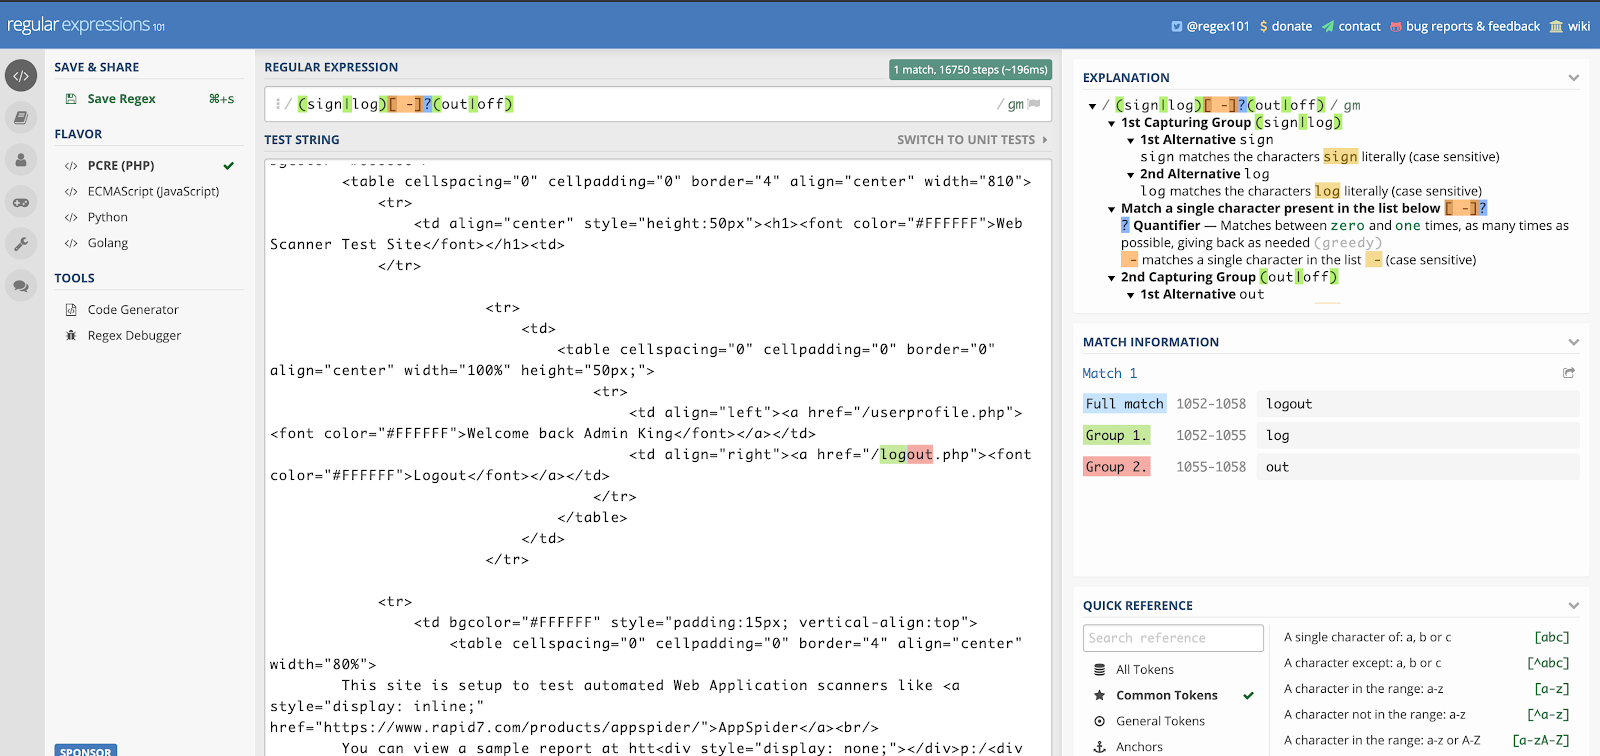
The default regex is copied in the Regular Expression section. In the Test String, copy the HTML response of the logged-in application page. As you can see on the right, we have a full match to the word logout, thus indicating that our default regex will in fact work as long as our recorded macro gets us to the specific logged in page.
Say there is no logout element defined in the HTML, nor do you see one in your application. The next steps would be to:
- Check if the logout button/element is hidden behind another component on the web page. Look behind a user profile dropdown or behind a “My Account” tab in your application.
- Verify if there is any logout component to your application at all.
If your application falls under the first scenario above, continue interacting with your application until it exposes the logout element in the HTML response, and validate that the default regex value will match the HTML content of the newly exposed content. The regex can be modified in the event you need to modify your regex to also look at elements other than sign out, sign off, log out, or log off. For Example:“(sign|log)[ -]?(out|off)|Web Scanner”
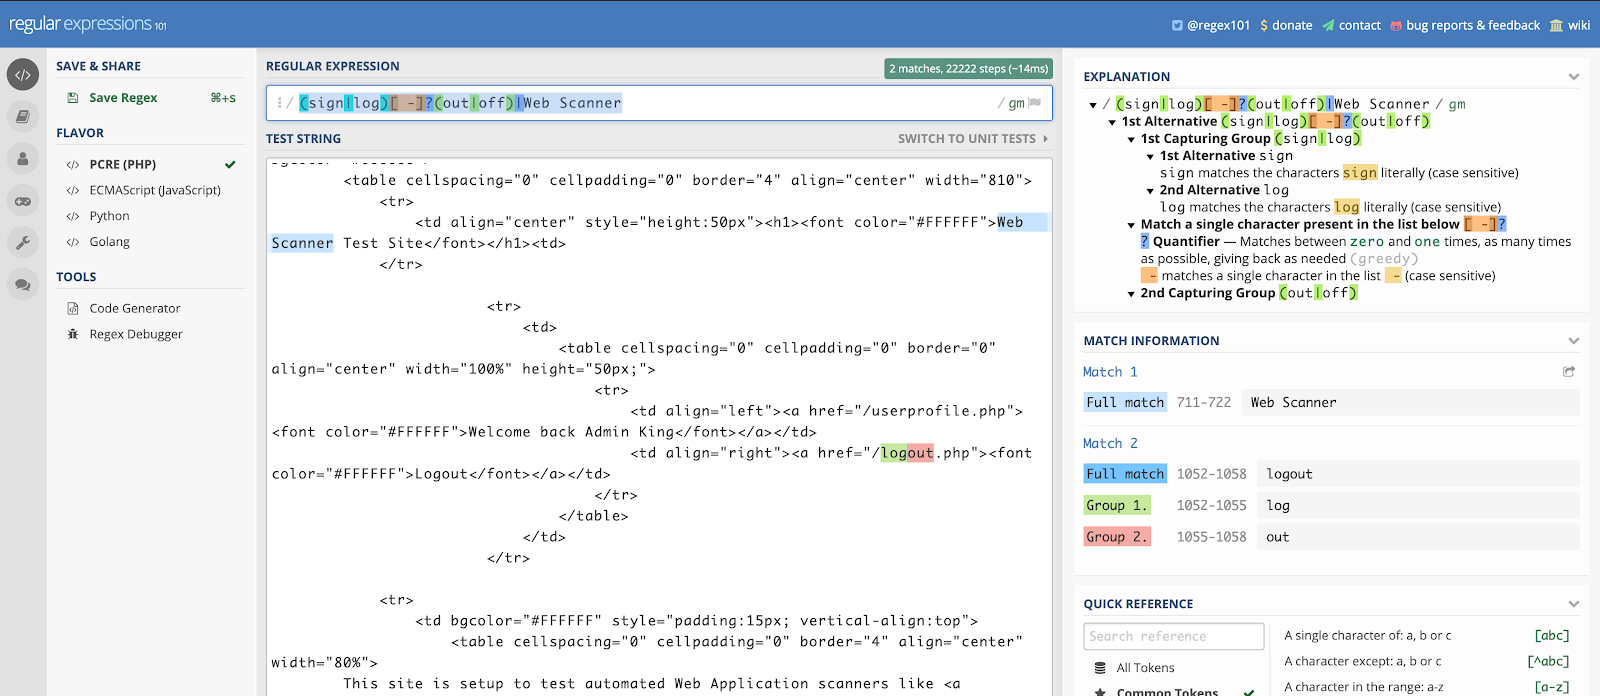
We can see that we have more than one full match with our modified regex. You can modify the regex as defined above by making sure it is validating against content on the page, which is to exist persistently in your application.
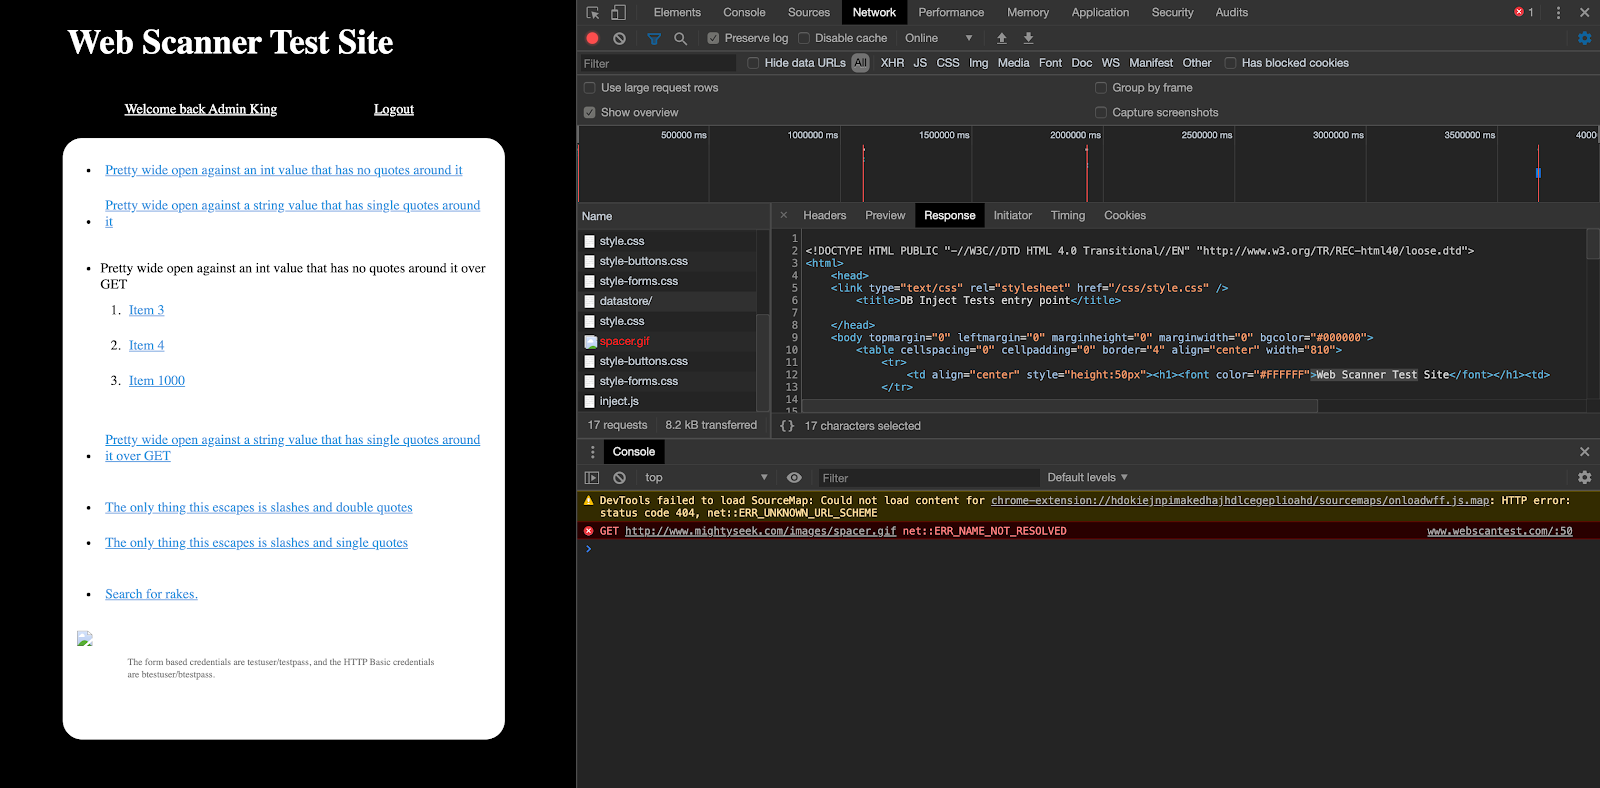
Even if we change the page in our application, it has the Web Scanner component visible and that will be validated using our modified regex above.
One key takeaway from this is that you don’t have to match against logout information for this to work. This can be changed to match anything based on the HTML content of the page the macro ends on in order to ensure authentication event passes successfully.
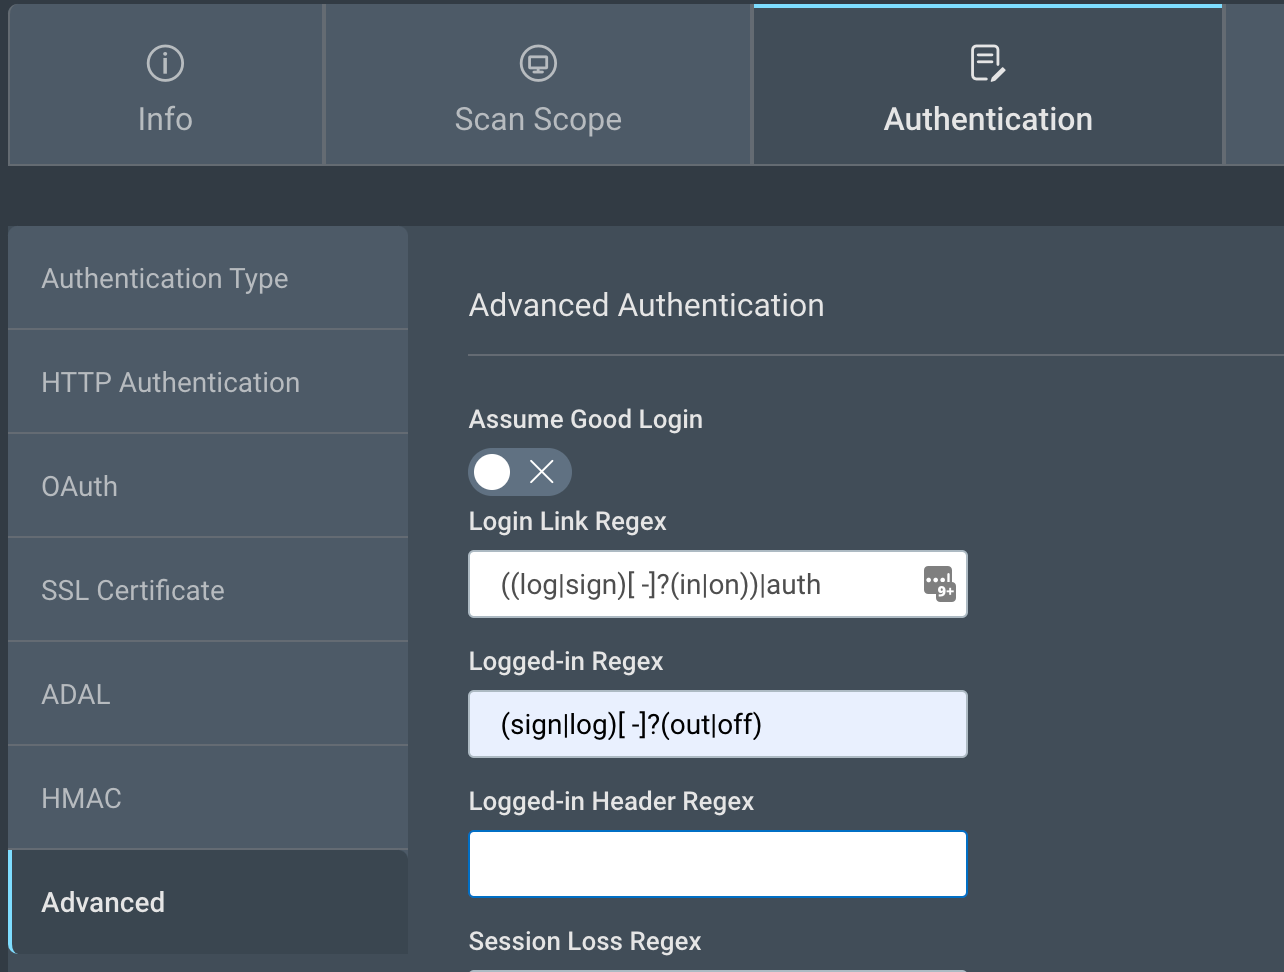
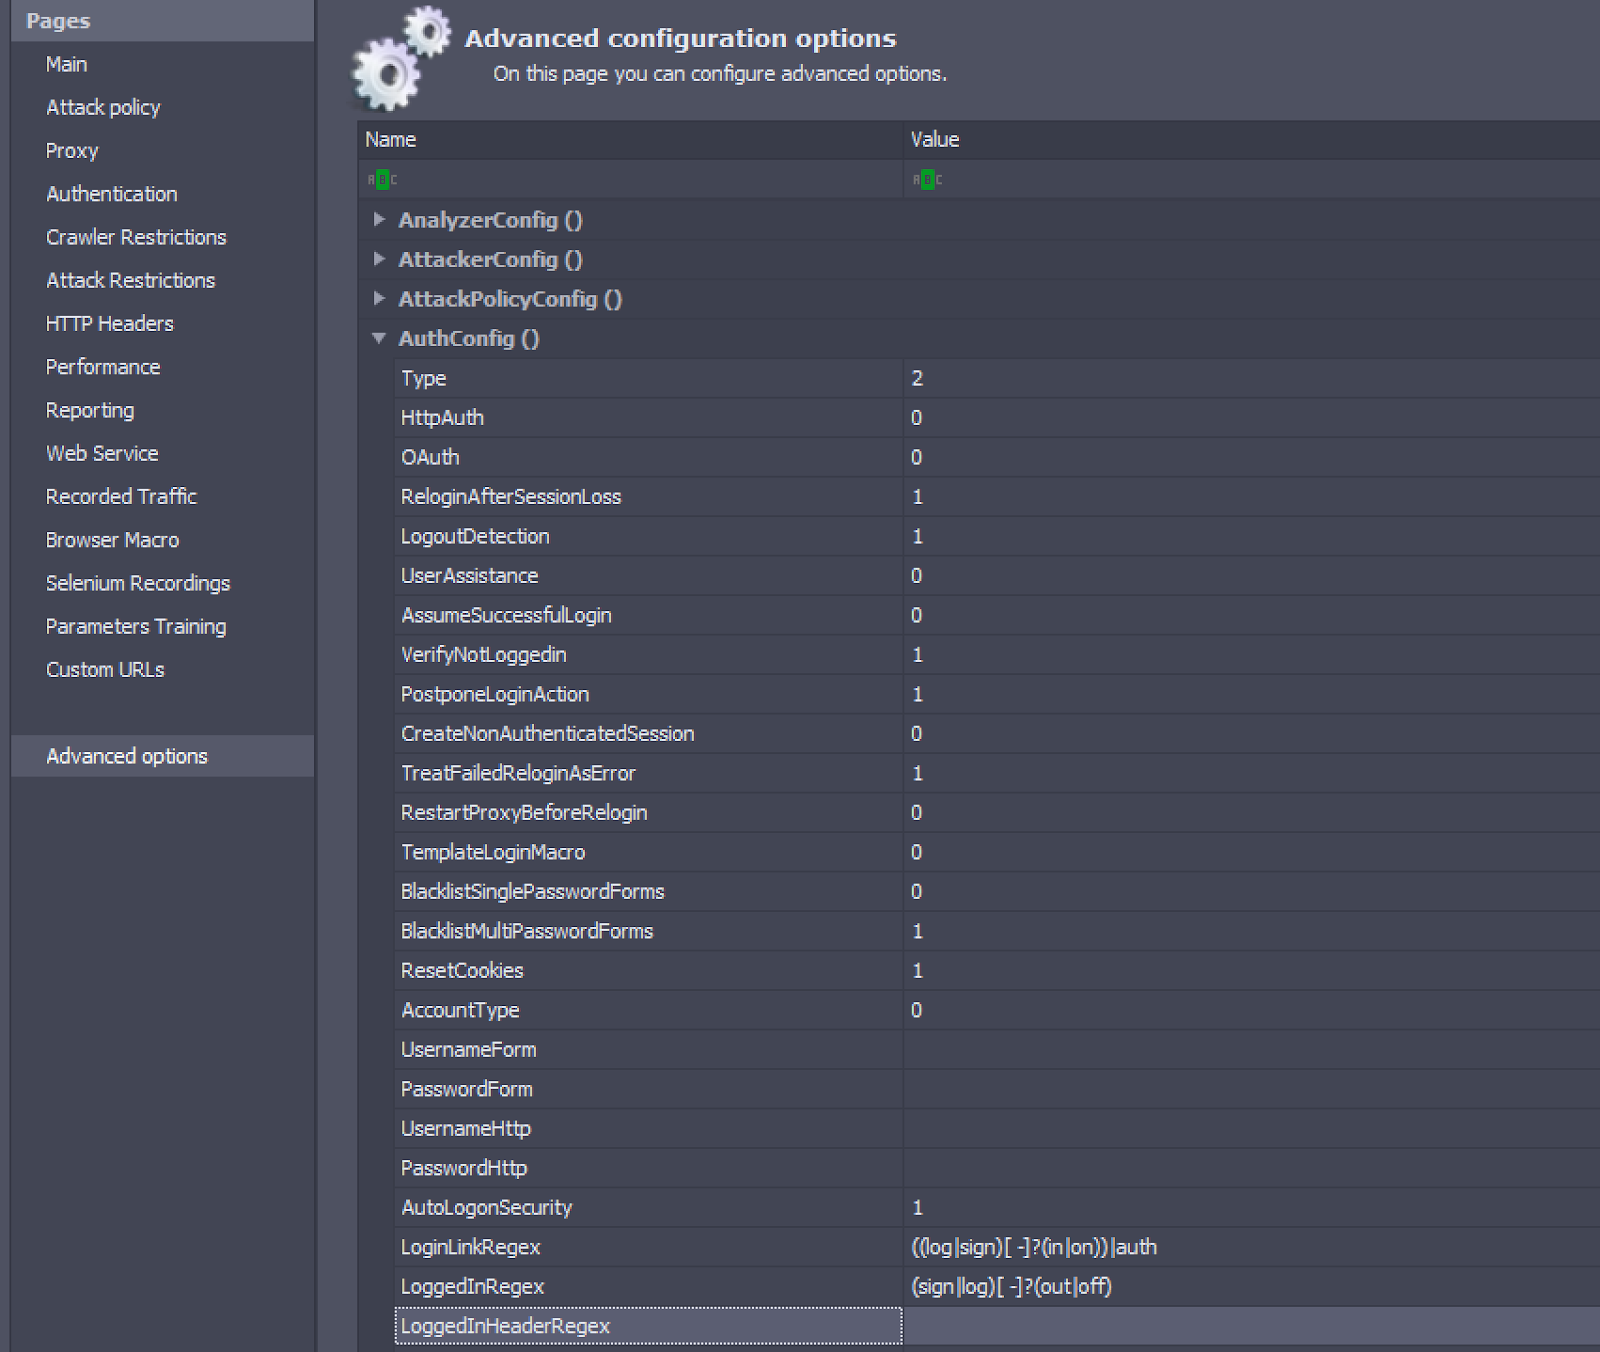
If your application has no logout component at all, the previous use case can be used to create a new regex that will match and validate the HTML page the macro lands on. You can use a different regex value, the Logged-in Header Regex, which exists right below the Logged-In Regex element.
In InsightAppSec:
In AppSpider Pro Edition:
In AppSpider Enterprise:
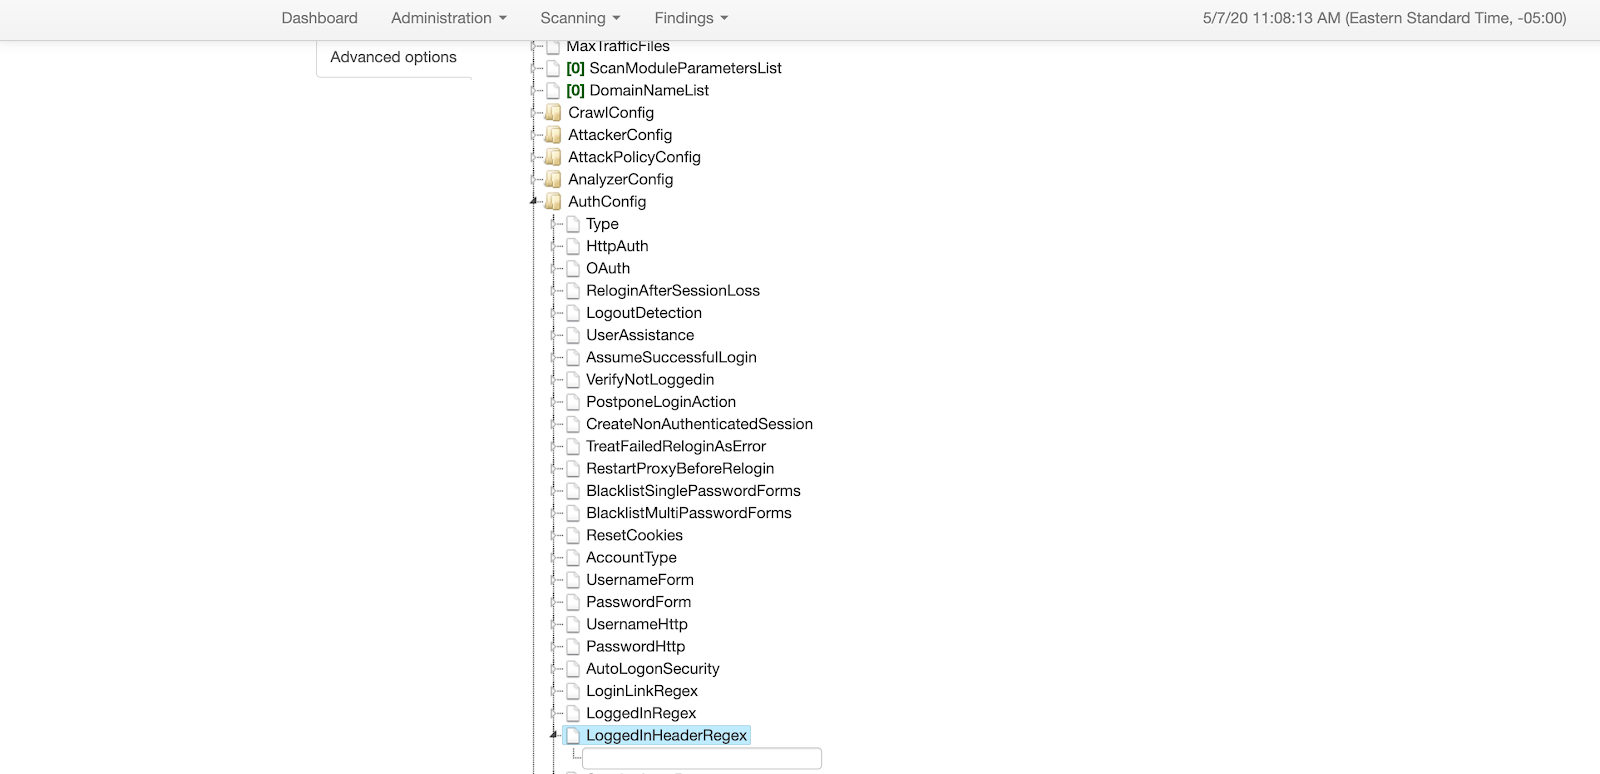
One key point to remember is that when using Logged-in Header Regex, it is important to delete any Logged-in Regex value above, as we do not want both regex values to be used as part of our scan. A success on one will pass the authentication after the macro execution is successful.
To find out what Logged-in Header Regex value we need to add, we go back a few steps above.

The cookie tab in developer tools should highlight the name being used of the cookie header, to validate the consistency of it, attempt to log out and log back in with the network tab open, and review the cookies and headers section, as seen below.
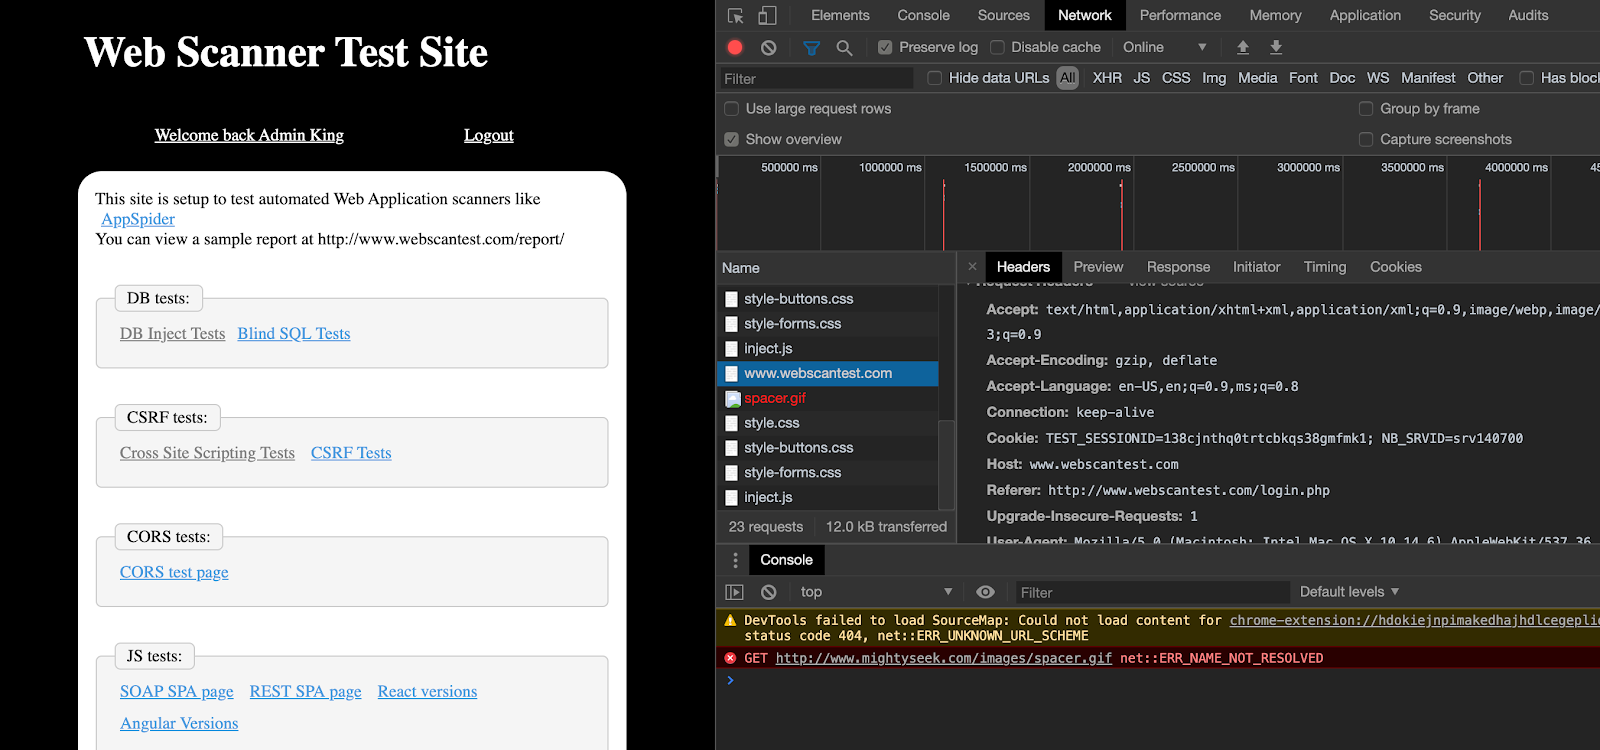
Once you have identified the name and consistency of the name of the Cookie, in this case TEST_SESSSIONID, this can be used in the Logged-in Header Regex.
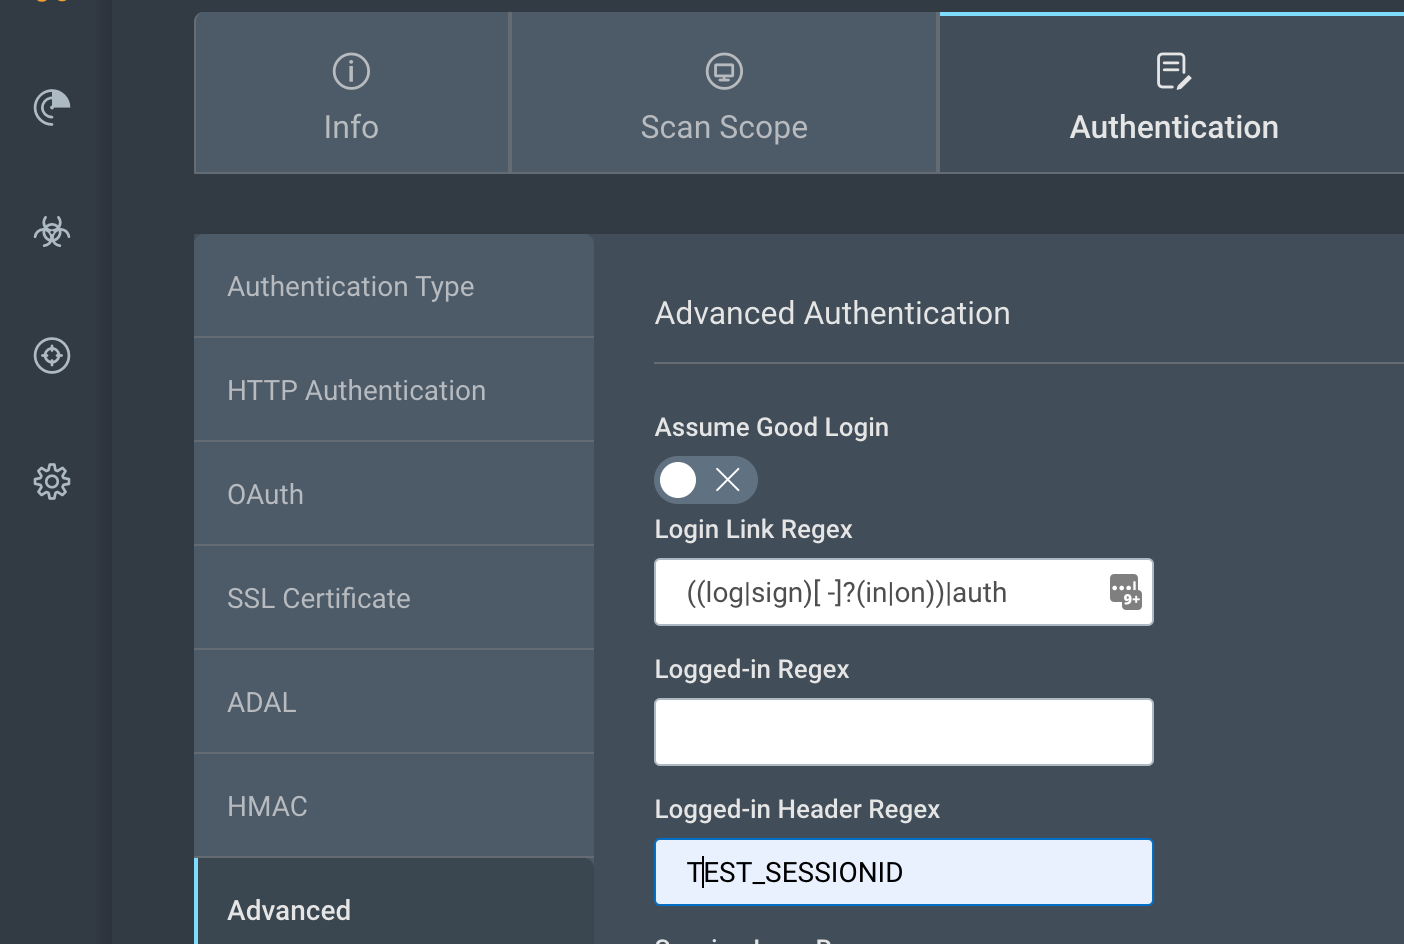
Keep in mind that TEST_SESSIONID is specific to the sample application we are using in this discussion. The Logged-in Header Regex value might be different in your case.
Once the regex values have been validated prior to running a scan, you can be sure that any modifications to the regex will work as long as the right pages/headers are exposed. If not, go back to the drawing board and revalidate based on the aforementioned steps until the LoggedInRegexError is resolved.
Where can I test my macros?
By now, you may have made many edits to your macro for authentication. Once you have modified your macro, you can reupload the modified macro similarly to how you uploaded the first macro. Steps under “How do I use a macro?” from the previous post can be followed to successfully use a macro in a scan.
In this post, we reviewed three types of error messages that can be seen if a macro authentication were to fail, and how to troubleshoot those error messages. There may be circumstances under which troubleshooting one type of error message might lead to another error being seen. Since troubleshooting is an iterative process, reviewing the Event Logs to identify the error and following the aforementioned steps will put you on the path to getting your macro working as expected. There may be some circumstances under which the aforementioned steps might not help, and the “Error executing macro” error might still show.
For those reasons, we will need to look at some advanced troubleshooting steps.
In the next post, we will be taking a deeper look at the steps to be taken if we cannot resolve “Error executing macro ...” with a simple change in the macro event duration. Check out part three here.